How to Create a Business Website in Nigeria [Easy Guide]
Learning how to create a website in Nigeria could just be the necessary boost you need to scale up your business.
It’s no doubt that the internet is exploding with sales and if you don’t have a website already for your business be it large scale or small scale means you’re missing out on the internet goodies.
Creating a website for your business will not only bring professionalism but also allow you to find new customers on the internet.
As a business owner, you’ll want to easily share your product and services with the whole world. And this can only be done easily by creating a business website.
Having a website will easily spread the news about your brand and grow your business more quickly.
However, this used to be a big deal before, but now you can easily create a website in Nigeria without having to know any code about web development!
In this article, you can rest assured of creating your website yourself without having to pay any developer!
I’ll hold you by hands and show you step by step on how to successfully build your website.
Without any further ado… let’s get down to it!
How to Create a Website in Nigeria – (Step by Step Guide)
Let’s take a look at the overview of what you will learn in other to successfully create your website without hiring any developer:
- Choosing Your Website Platform
- Buying Domain & Hosting Your Website
- Setting Up your Website by Installing WordPress
- Adding Your Website Pages
- Installing Elementor Plugin
- Adding WordPress Plugin for More Functionality
- Summary of Everything
Step 1. Choosing Your Website Platform
This is where building your website could go wrong from the on-set if care is not taken.
The biggest and common mistake most beginners make is choosing the wrong platform for their website.
Well, luckily you’re here, so you won’t be making that kind of mistake. So, for building your website I’m going to recommend the only best platform out there which is WordPress.
WordPress is the most popular website builder in the whole wide world and it powers over 34% of the entire website on the internet.
This includes millions of small and large scale business website all over the world. The best thing about WordPress is that it’s perfect for both newbie and experienced web developer.
You’ll have access to thousands of pre-made website templates, add-ons and extensions to easily build your site.
All these will give you the ability to be able to build any kind of website without knowing any codes whatsoever!
However, you should know there are two types of WordPress; we have the WordPress.org and WordPress.com.
The real one being the WordPress.org is a self-hosted platform while WordPress.com is a hosted platform.
That is, users can only pay to use their full potential service (WordPress.com) while WordPress.org is hosted by you through your domain and web hosting provider.
The recommended among the two is WordPress.org because it gives you full ownership of your website.
Step 2. Buying Domain & Hosting your website
To successfully create your website you’re going to need the following:
- A Domain Name
- Web hosting
- A couple of hours to set it up
Domain Name:
This is your unique website address. For example, smartbizfreedom.com. This is very important to your website because:
- It defines your business brand
- And it gives people an idea of what your business is all about
So, it’s always important to take time while choosing your domain name because it’s going to go a long way with the branding of your business.
I’ll recommend you go for a catchy and easy-to-remember domain name that goes well with your business name.
Most importantly, keep it simple and easy to pronounce.
Web Hosting:
on the other hand, is your website home and where all your files will be stored.
Think of it as the actual house while your domain name is the address to that house.
Your web host is actually the most important part because you can’t have a website with just a domain name. You’ll need a hosting platform to make it visible on the internet.
For this, I can gladly recommend one of the best for you, which is… BlueHost! This is a wonderful platform with great customer service; you can always expect great service in return for your money.
Plus you’ll be getting a free domain name without paying a penny and a huge discount on the hosting price.
The cost of creating a website in Nigeria with Bluehost is around $48/year which is quite reasonable.
Why Do I Recommend BlueHost?
Bluehost is currently hosting over 2 million websites across the globe and they have a 99.9% uptime guarantee.
This simply means you can rest assured that your website is not going down any time soon.
I believe using Bluehost is going to save you whole lots of stress and save you lots of money in the long run. Below are the highlights of why they are considered one of the best web hosting providers.
- It crazily loads fast
- Comes with a Pre-installed WordPress
- Free SSL certificate
- You’ll also get a free domain name
- 30 days money back guarantee
- Officially recommended by WordPress.org
- Well-established web hosting company
- Easy to use Cpanel
- Free technical support and many others
I’ve changed my web hosting provider for three times and I can gladly recommend Bluehost for any of my blog readers.
This will save you from the kind of ordeal I went through while using the wrong hosting provider for my website.
Since that’s out of the way… now, we need to go and purchase the web hosting then get our domain name for free!
What you need to do now is visit the Bluehost website and opens it on another tab. You can then continue with this tutorial to create your website.
Click on the “Get Started Now” button to continue.

At the next page, you will be asked to choose a pricing plan for your web host. Since you’re just getting started, you can start with the Basic plan and later upgrade if need be.
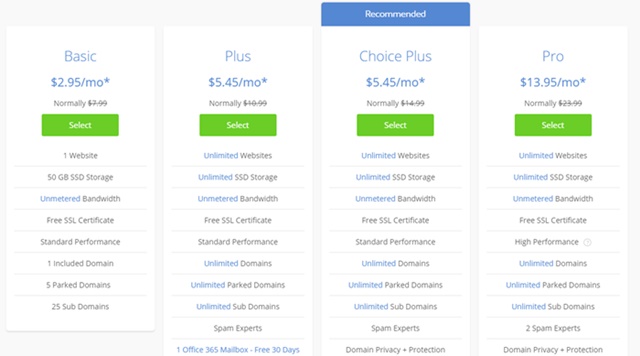
Simple click on the “Select” button as showed on the image to choose your plan and move to the next step.
Next, you’ll be asked to choose your domain name for your website and if you have one already, you just have to enter it in the next box at the right-hand side.
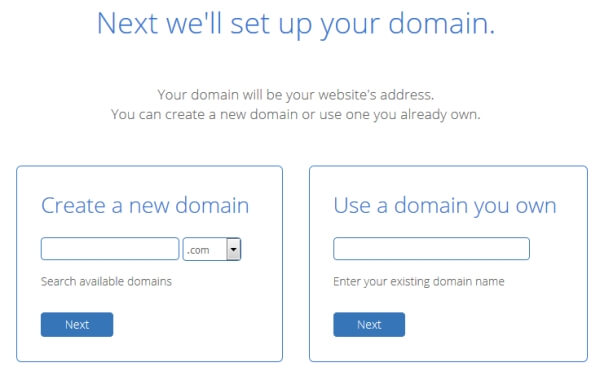
Note: If you decided to use another domain name from a different provider you’ll need to point to Bluehost nameservers.
- ns1.bluehost.com
- ns2.bluehost.com
After getting your domain name, you’ll need to enter your contact information in other to create an account with Bluehost for you automatically.
Meanwhile, the next page will ask you to choose your package plan. You’ll have the option to choose from 12, 36 or 60-month straight subscription.
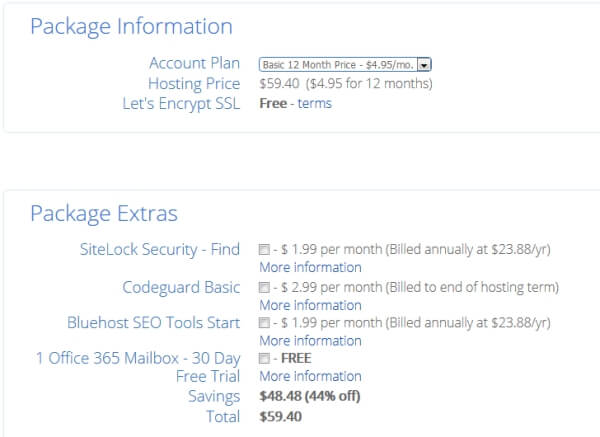
The price will be brought down based on the month’s package you choose. Also, note that you don’t need to tick any of the additional boxes except for “Domain Privacy Protection”
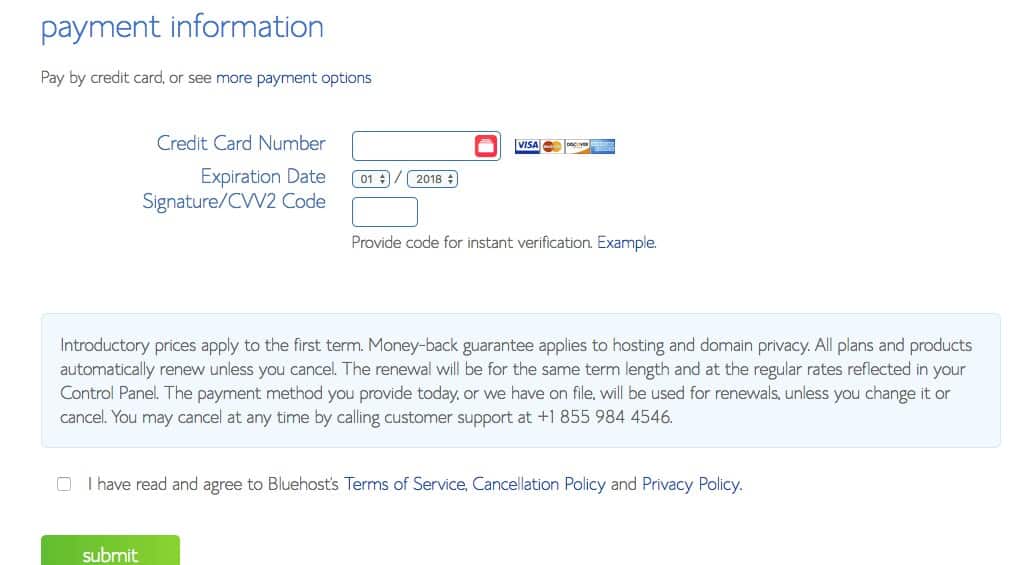
Finally, on the next page, you need to enter your credit cards details to check out. After that scroll down and tick the “Terms of Service” to agree then finally click the submit button.
Nice!
Your website is almost ready now!
After this you’ll be asked to create a password that will be used to login to your Bluehost account and once it done you can now have access to your Cpanel and also log in to your website from bluehost if you want.
Step 3: Setting Up your Website by Installing WordPress
After purchasing your hosting plan, your account information must have been sent to your signed up email address.
Immediately after that, Bluehost will prompt you to choose a theme for your website. You can decide to choose anyone because you can always change it any time you want.
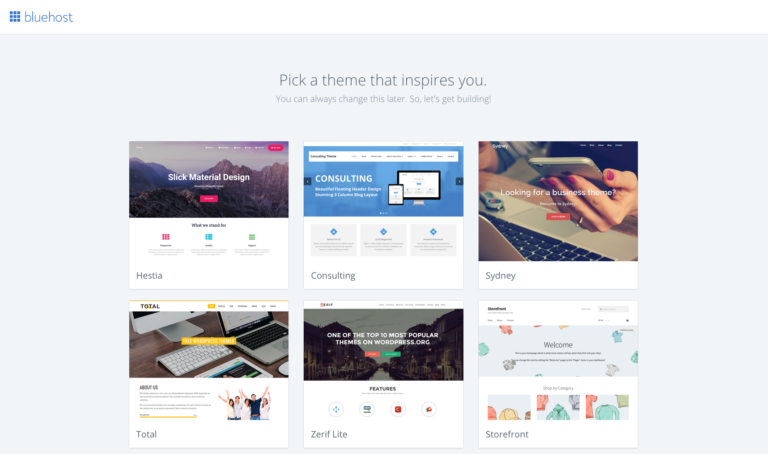
From the account information sent to your email address, there’ll be a link to create a new password for you to login to your account.
Once you’ve chosen your password, you can log in to your Bluehost control panel.
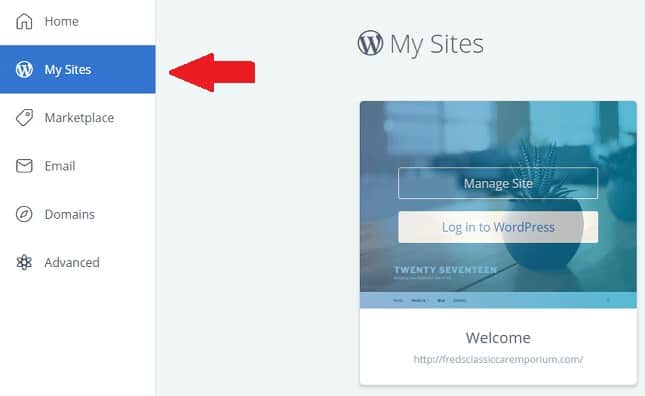
Remember I told you that Bluehost has WordPress pre-install so you don’t have to worry about installing it again.
You just have to set up your WordPress site by entering your site name and tag line. For the Site Name, in my case its “Torchbankz”, while the Tag line is what is the website is all about.
Next, you’ll need to login to your WordPress admin dashboard to start customizing your website.
You can either log in directly from your Bluehost control panel by clicking the “Login to WordPress” button.
Or log in through your WordPress by visiting your “www.yourdomain.com/wp-admin or www.yourdomain.com/login
Once in your WordPress admin dashboard, the interface should look like this…
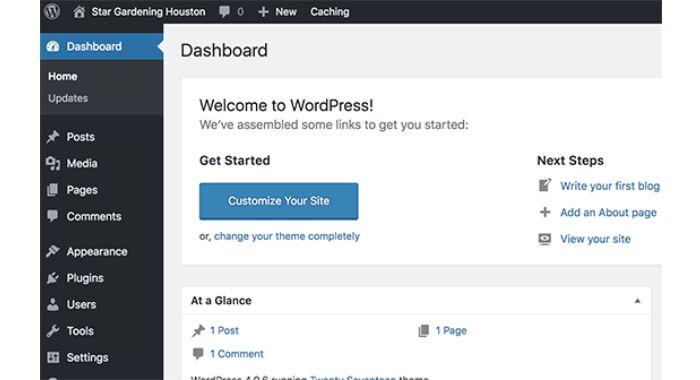
From your WordPress admin area, you can change your settings, create several pages about your business and manage the entire site.
Step 5. Install Elementor Plugin
Now that you’ve completed the WordPress installation and also Log in to your WordPress Admin backend. The next thing to do now is to install the Elementor plugin for designing your website.
But before we go ahead let’s have a clear understanding of what the Elementor plugin is and what it does so you can know the exact effect it’s going to have on your website.
What Is Elementor?

Elementor is the easiest to use and free WordPress page builder that let you easily design or create a beautiful WordPress website from scratch without learning any code.
It’s an easy drag and drop page builder that offers limitless design possibilities. It also comes with an amazing library of pre-designed templates.

This means you can easily search for templates that are similar to the website you want to create and have it edited to your perfect taste.
Do I still need to remind you that you don’t need to know any coding skills? All you simply need to do is edit the template using the drag and drop format.
Is Elementor Free?
The core plugin (Basic Elementor) is free. But if limited in terms of functionality but can still get few things done.
However, For Elementor Pro, the pricing starts at $49 per year for 1 site, then $99 per year for 3 sites, and $199 per year for unlimited sites.
Now that we fully understand what elementor does, let’s proceed to the installation process.
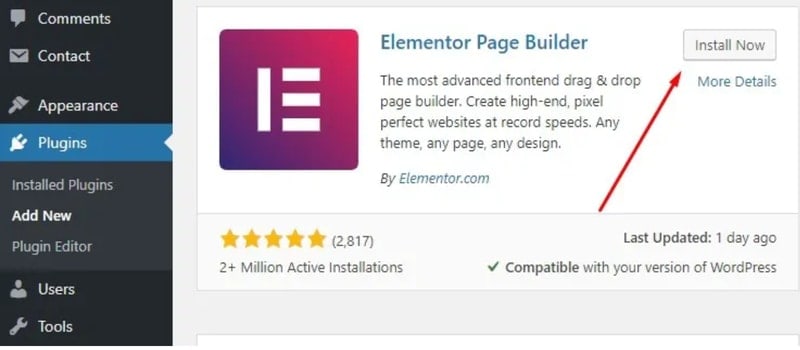
To do this, simply go to the left-hand-side area of your WordPress admin dashboard and hover your mouse on the plugin as you can see in the image below.
After that click on “Add New”

On the next page that opens, enter “Elementor Page Builder” in the search box and press the enter key to search for the plugin.
The next result is going to bring out the Elementor plugin. Once you’ve seen this, Ignore the rest of the result entries and only click on the install tab beside the “Elementor Page Builder.”
After the installation is complete, the tab menu will automatically change to activate, click on it to activate the plugin. Now you have your Elementor plugin fully installed!
Or simply watch this video for clear understanding…
Once everything is in place the next thing we will do is to start creating our website pages.
Step 4. Adding Your Website Pages
After installing WordPress your website is now live! However, you’ll need to create some important pages to add your business information.
Business websites are not loaded with a pile of content, you just need the essential ones. So, for this, you need to create a simple page with your business information and for other users.
To create a new page, you’ll need to login to your WordPress admin area, then go to Pages >> Add New.
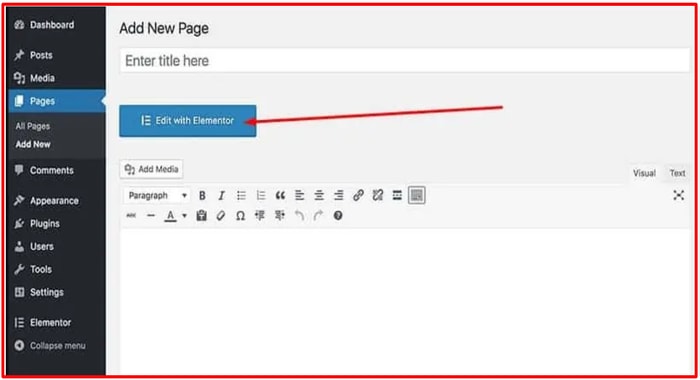
So far you have the Elementor plugin installed, immediately you click on ‘add new page’, you will see the “edit with Elementor” button under the title area.
By clicking on it you’ll be able to customize the page you’re creating with the Elementor page builder without editing any code.
Below are some of the most common pages used for business layout:
Homepage –
the “Homepage” is the welcome page of your website. That is, this is the first page every visitor visiting your website is going to see.
At the home page, you can add your business name with a ‘call to action’ to your products/services or to your contact us page.
Add a brief description of what your business is all about and why your customers should patronize you.
Contact Us –
the “Contact Us” page is where your users/potential customers will be able to reach or contact you.
For this, you need to install a contact form plugin in other to do this or simply add your phone number or your business physical address.
About Us –
this is the page where potential customers can go to know more about the people behind a business before they can make their final decision.
Your “About Us” page should tell users or potential customers who you are, what are your business values and your relevant experience in your chosen industry and why people should patronize your business.
Products/Services –
this page should contain the various products/services you’re offering.
Try as much as possible to add a heading for each product/service and provide a brief description. You could also add pricing or simply ask them to contact you for a quote.
Finally, you can create as many relevant pages as you need. Just make sure you add the proper title of the page you’re creating.
Editing Your Pages With Elementor
Once you have one (Pro or Free) of the Elementor plugins, you can start creating your website pages. However, you should know you’ll need both if you’re going for the pro plugin. You can easily download it here.
For creating and editing your page we’re going to use the home page as an example and the same procedure can be used for any of the pages you want to create.
Creating Your Homepage
To create your page, from your WordPress admin dashboard go to (Pages -> Add New) and edit it with Elementor. Give this page a name like “homepage”, or “front page”.

After that, Set the page layout by clicking the gear icon on the bottom-left corner on the left panel. Set the page layout to Elementor Full Width or Elementor Canva.
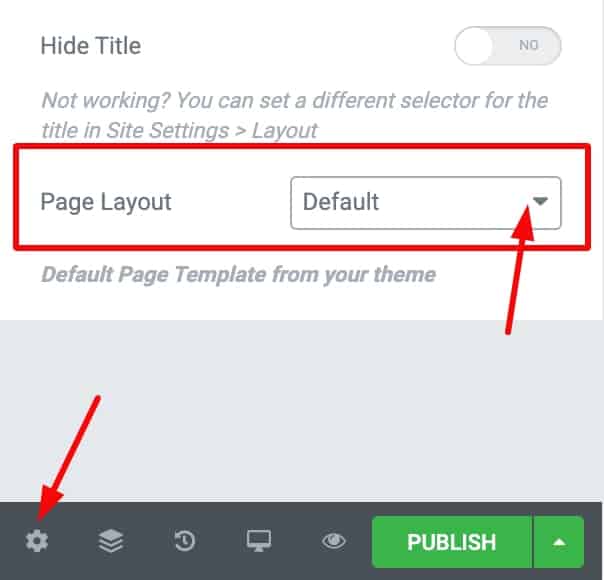
As I said earlier, one the unique feature of the Elementor plugin is that you can choose from their wide variety of template to create your website.
Depending on the kind of website you want to create, you can find a similar template close to what you have in mind and edit it.
To choose the template for designing your website, all you need to simply do is click the folder icon on the canvas area to import the homepage template you’d like for your website.

Once you’ve clicked on the folder like icon on the right from the image above, it’s going to open up templates and blocks of some pre-done website template you can use to customize yours.
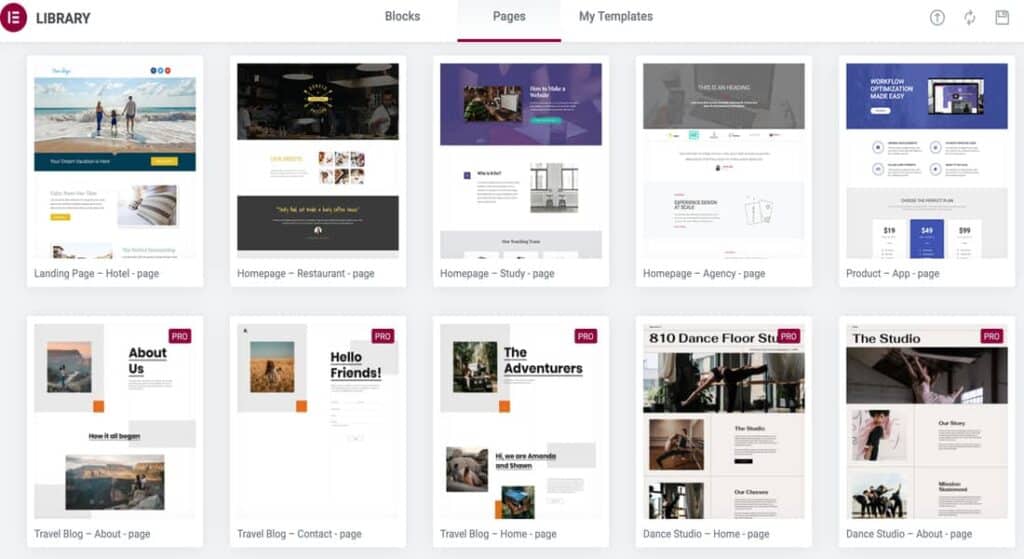
Browse through the templates and preview anyone you like or similar to the website brand you want to create. Once you’ve seen it, click insert on top of the page and everything will be imported to your website.
From your website, you can now start editing the page one after the other. Better still watch the video below to have a better and clear understanding on how to create a page and edit it.
After creating your home page, the next to do now is to go to setting in your WordPress admin dashboard, then go to -> Reading.
Once there, set the homepage display to a ‘Static Page’ and select the homepage you have just created from the dropdown menu and click the Save Changes button.
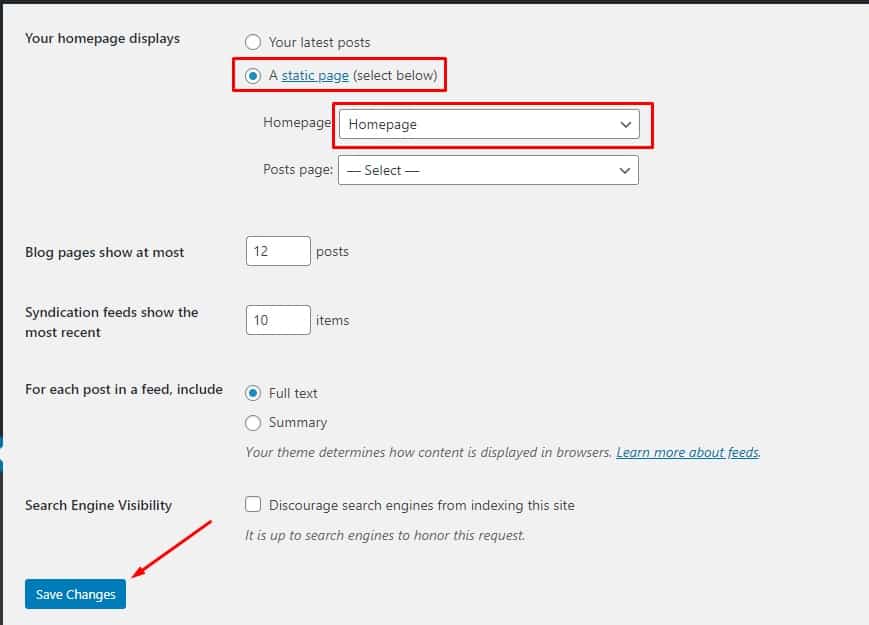
Once this is done, you can now visit your website address to check out the design you’ve just created.
Step 6. Adding WordPress Plugin for More Functionality
WordPress has over 50,000 free plugins that you can easily install and activate on your website. There’s virtually no feature you want that is without a plugin.
The interesting part is you can use these plugin to add several features to your website without having to touch or know a single code.
Below are a few recommended plugins you might need to install on your new business website:
- WPForms – the WPForm add contact forms to your website. This way, your users can easily connect with you using the forms.
- Yoast SEO – the Yoast SEO plugin improves your website for search engine optimization. This way, you’ll be able to generate free internet traffic your website.
- UpdraftPlus – the Updraft plugin helps back up your website content in case the unusual happens.
- MonsterInsights – this is a Google Analytics plugin that helps track your website visitors.
- WP Super Cache – this one increases your website performance and site speed by adding cache.
How to Create a Website in Nigeria (Summary)
Here’s a quick recap of everything you need to do…
First, you need to come up with a domain name for your website. After that, head over to Bluehost and choose your hosting plan.
Bluehost has WordPress pre-installed. So, you shouldn’t be worried about installing WordPress on your Website.
After your check out on Bluehost, simply login to your Bluehost control panel to set up your WordPress.
After that, log in to WordPress and Install the Elementor Plugin to create the necessary page about your business. Next, and finally, install other plugins for more functionality.
I hope this article helped you learn how to create a website in Nigeria.
If you like these articles please share them with your friends on social media. If you have any further questions about this, please feel free to use the comment box.
I’ll try and reply immediately.

![How to Build an eCommerce Website in Nigeria [2025]](https://smartbizfreedom.com/wp-content/uploads/2022/09/Untitled-design-32-768x365.jpg)
![Shopify Review: How To Use Shopify In Greece [Pros & Cons]](https://smartbizfreedom.com/wp-content/uploads/2023/09/Greece.jpg)

![Shopify Review: How To Use Shopify In India [Pros & Cons]](https://smartbizfreedom.com/wp-content/uploads/2023/09/India-1.jpg)
![Shopify Review: How To Use Shopify In China [Pros & Cons]](https://smartbizfreedom.com/wp-content/uploads/2023/09/China.jpg)
![Shopify Review: How To Use Shopify In Thailand [Pros & Cons]](https://smartbizfreedom.com/wp-content/uploads/2023/09/Thailand.jpg)
Perfect
Thanks