
How to Open a Stripe Account in Pakistan [Working 100%]
Is Stripe available in Pakistan? Let me give you an answer to that by showing you how to open a stripe account in Pakistan for your online business.
The truth is, you can use stripe for non-supported countries if it’s not allowed by default in your country and this of course is in a legal way.
Stripe is the number one payment gateway you can use to receive or process payment online from your customer from any part of the world.
Irrespective of the kind of business you’re running or trying to create, be it, eCommerce website, Booking Service or Subscription Service.
You can easily use stripe to process your payment without going through any stress, unlike other Payment gateway services.
Stripe itself is free to use, however, they charge 2.9% + 0.30 cents for every successful payment made by your customers.
So technically, you can still add the charges to your product price and use the whole service for free.
The bad news however remains that stripe is not supported in Pakistan, which is the focal point of this article.
So if you need a verified stripe account in Pakistan to process payment online I want you to keep on reading.
You’ll learn how to use stripe in Pakistan and as well as how to set up a stripe account in Pakistan without stress.
Why You Should Use Stripe in Pakistan as Your Payment Gateway
I’ve tried quite a few payment gateways to receive and process payment online and I find most of them to be complex and time-consuming.
However, Stripe on the other hand is very easy to set up, integrate with other tools and easy to maintain, due to its sophisticated API.
This should be your number go to if you’re planning on receiving payment online without any stress.
Let’s check out some of the benefits of using Stripe as your payment gateway.
- Recurring Payments – You can easily use stripe to set up recurring automatic payments on your website. That is, you can bill your customer automatically on a monthly or yearly basis.
- Delayed Payment – It allows you to set up a delayed payment by giving your customers few days to enjoy your service before they actually billed them. This is good for those offering free trials.
- Discounts & Coupon Codes – With stripe you can easily set up coupons and discount codes that can be used by your customers. This is good for those running promos.
Subscription Payments – Just like a subscription it gives you the ability to receive subscription payments from your customers. - Pro-rata Charges – These are charges your customer pays for using have half of your service. So instead of billing them full, you can charge them for the days they’ve used.
- Rebill without Storing Credit Card Details – Stripe is of the payment gateways that allow you to rebill your customers even without storing credit card details.
- Cheap Pricing – Stripe also offers a flexible pricing fee. They charge 2.9% + 0.30 cents for every successful payment made by your customers.
- Excellent reminder system
- No refund fees
- The informative interface of graphs and charts makes data comprehensible and clear
- Seamless checkout experience means increased conversions
Requirements to Open a Stripe Account In Pakistan
For you to set up a Stripe account legally without any future issue in Pakistan, you’ll need the following:
- A Business Formation in the US (LLC)
- EIN or Tax ID (Employer Identification Number)
- Personal US Physical Address
- A US Phone Number
- Lastly, a US Bank Account
Now, before you get confused, everything can actually be set up within a few days and equally at a very low price compared to others charging $1000
The most important of all is creating a Limited Liability Company (LLC) in the US in other for you to get your Tax ID (EIN).
Once you’ve gotten your EIN or Tax ID, you can then proceed to create your Stripe account.
But luckily for you, you don’t have to pay for the business formation, however, you do need to pay for state filing and tax ID.
Setting Up an LLC for Your Business in the US
One of the great advantages of having your business set up in the United States isn’t just for using Stripe. You can have multiple businesses under your registered business name in the US.
Also important is that you don’t have to have a Social Security Number (SNN) to set up your business in the US.
You just need to choose a business name and decide on the state where you want it registered.
However, you need to be careful about which state you decide to set up your business entity. This is because some states charge high state filing (Business Registration) and as well as annual business tax.
But I do find;
- Colorado
- New Mexico
to be quite affordable.
Colorado charges a $10 annual Tax fee and $50 state filing, while New Mexico charges a $50 state filing and $0 annual Tax fee.
At least at the time of writing this article. You could also do further research on that if you want.
The state annual tax is a tax you pay on your business at the end of every year. So, they vary based on the state you choose to set up your business.
States like California and Hawaii should definitely be out of your pick because they are freaking high on tax.
But not to worry, the sole purpose of this post is to show you how to get it done as easily as possible and at the cheapest fee.
I’m equally not based in the US, and I have my business set up there, so I can easily use Stripe in Pakistan.
I was able to do this using Northwest Registered Agent and New Mexico as my business state because they’re relatively cheap.
The good news is I’ve been able to partner with them because I know many people will be needing this service and I want them to have it at the best place.
Plus, there are various services out there charging as high as 500 – $1000 for this same purpose. A good example is Stripe Atlas. But at the end of this post, I’ll show you how you can get it done for less than $290.
Coming from someone who’s also living in a country where Stripe is not enabled, I know how beneficial it can be for your online business. Most especially my blog readers!
How to Form Your Business LLC in the US Using Northwest Registered Agent
In other to be able to use Stripe in Pakistan to process payment as a non-US resident you do have to form a business entity in the US using Northwest Registered Agent.
Northwest Registered Agent offers online business incorporation services, as well as additional business services such as record books, operating agreements, federal tax identification numbers, etc.
I did intensive research before finally picking Northwest Registered Agent for my business LLC formation in the US. Their service was on point, and I was moved to partner with them to share with you guys.
Going through their reviews on Google reviews should show you exactly what I’m talking about; they are simply the best out there.

Now let’s proceed to form your LLC at Northwest Registered Agent:
Setting up your LLC with Northwest Registered Agent is really straightforward; I’ve broken it down into the step-by-step guide below.
All you need do is follow the steps, and your LCC and Tax ID will be set up.
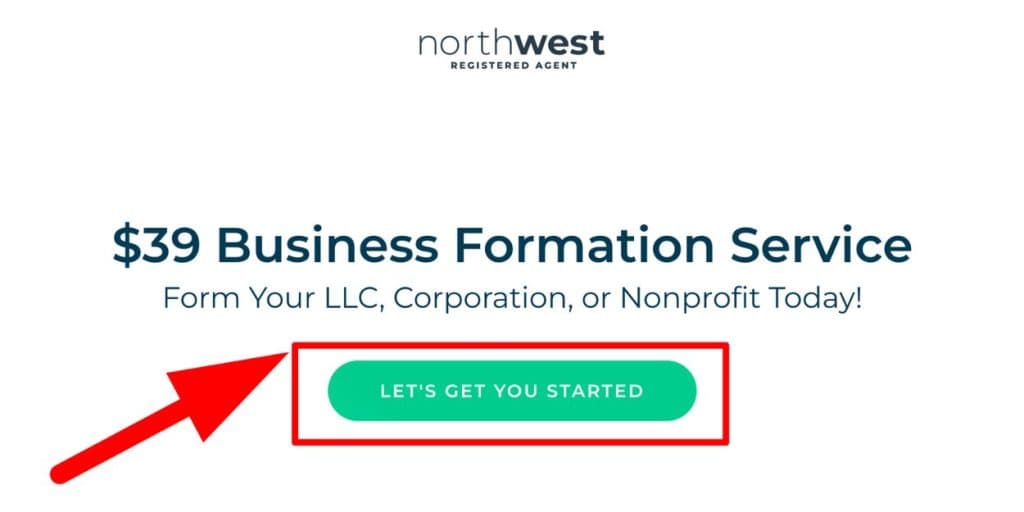
Step 1. Head Over to Northwest Registered Agent
First, you need to head to Northwest Registered Agent to get started. Upon getting to the web page, click on the “Let’s Get You Started” button…
The next page is your business entity type and the state you want to form the LLC.
Step 2. Choose Your Business Entity and State
Simply choose LLC (Limited Liability Company) from the drop-down menu and choose your state. You can go with New Mexico because of the low cost and the free annual tax fee.

The business formation fee itself is $39, and the state fee for New Mexico is $50 as you can see from the image above.
You can also see the option of spending it up below the state. The opt 6 days, 4 days, and 2 days processing for your business formation.
After that, click on “Continue”
Step 3. Enter Your Companies Information
As I said earlier, you’ll need to pick a name for your business and a search will be carried out on it to check if it’s still available.
Your business name will be created immediately upon state approval if it’s available. However, in the case where your proposed business name is not available, you’ll need to adjust the name or find another one.
But it’s not going to cost you any additional fee!
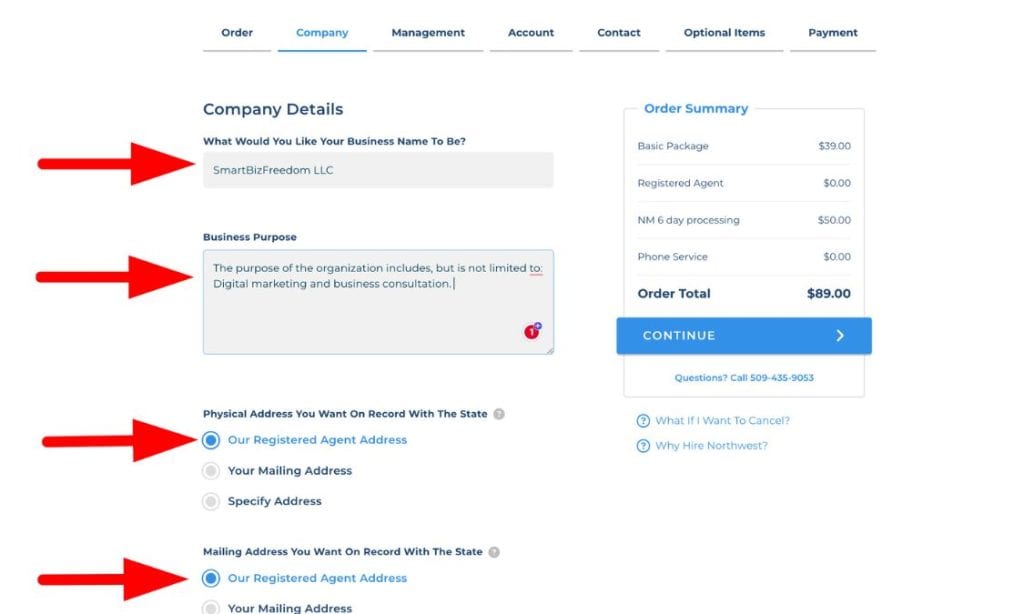
What you need to do here is enter your proposed business name, A good example is Smartbizfreedom LLC and also write a short description of the business.
Another good option for using a Northwest registered agent is the fact that you don’t have to bother about a US address for your company.
Northwest registered agent gives you the option to use their address as your business address. Some other agents require you to rent a virtual address for this.
But with Northwest Registered Agent, it won’t cost you extra money. For the mailing, you could also use them only if you don’t have a mailing address option.
If you want your physical documents, add a US mailing address for this option.
Step 3. Enter Management For Your Company
The next step is about the business owner. At this stage, you’ll need to if the business is member-managed or manager-managed.
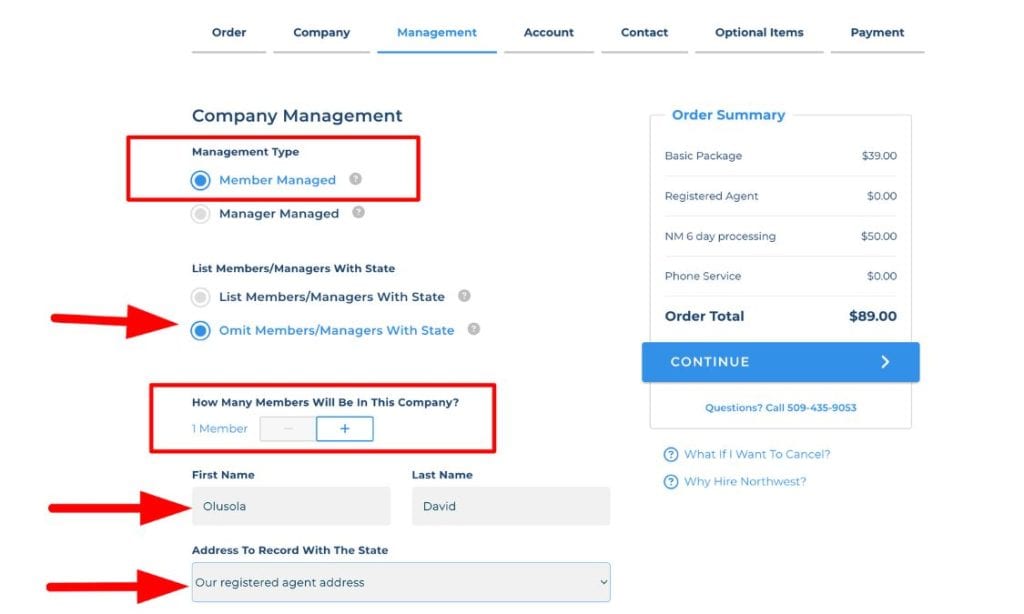
Next, tick the “Omit Members/Manager with the state, which will keep your business details private from the state you’re forming it. After that, indicate how many members will be in the company.
Since it’s a single-man business, you can leave it at one member and then enter your name as you can see mine from the image above.
Step 4: Create an Account with Northwest Registered Agent
At this stage, you need to create an account with Northwest registered agent so you can manage your business from their dashboard.
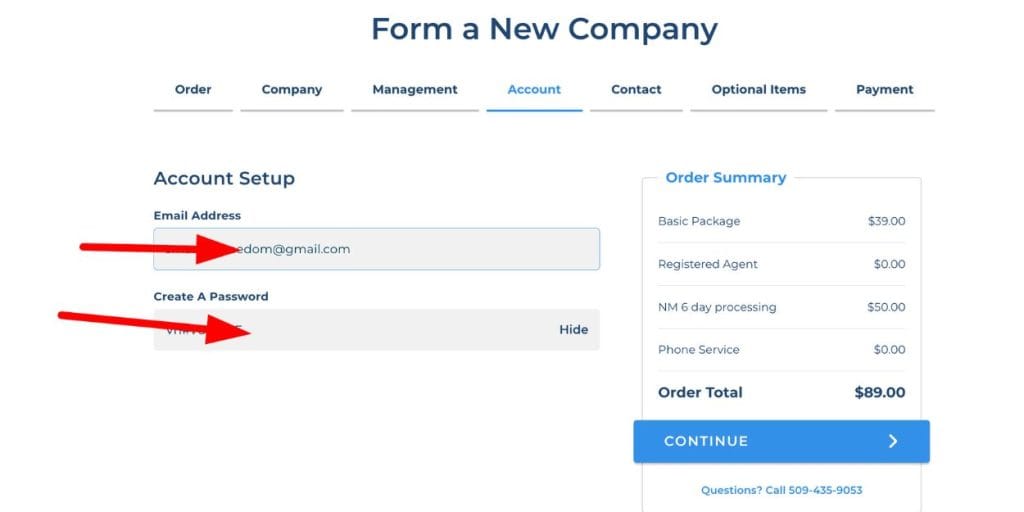
As you can see from the image above, enter your email address and create a password for logging in to your Northwest registered agent account.
After that, click the continue button.
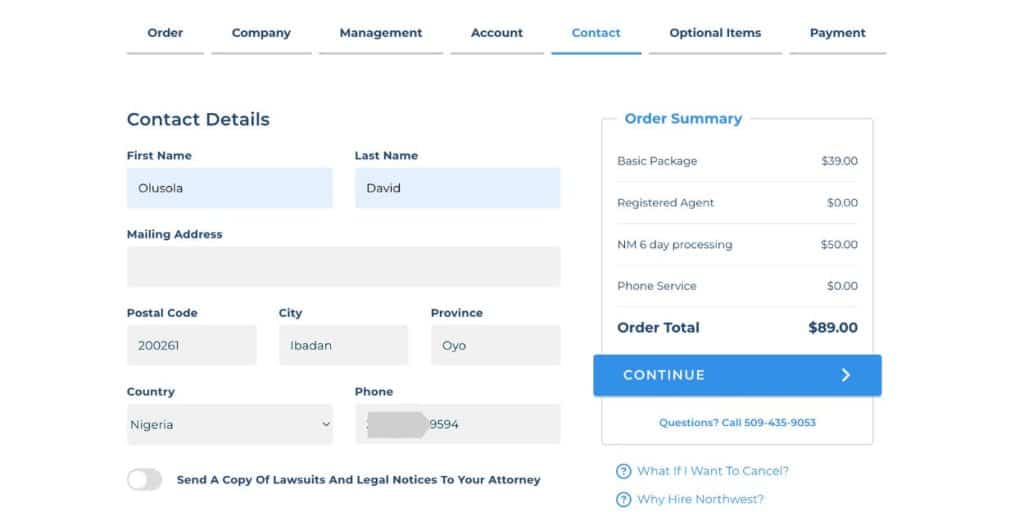
The next thing you want to do is enter your contact details, which will be your contact details for Northwest Registered Agent.
So make sure it is your original details and the country you’re living in.
Step 5: Getting Your Tax ID (EIN)
Northwest registered agents will get your EIN or Tax ID for just $200 if you don’t have an SSN or you’re a foreign entity, which is relatively cheap compared to other services out there that may look cheap but have hidden charges.
Northwest is 100% transparent about all the money you’ll be paying.
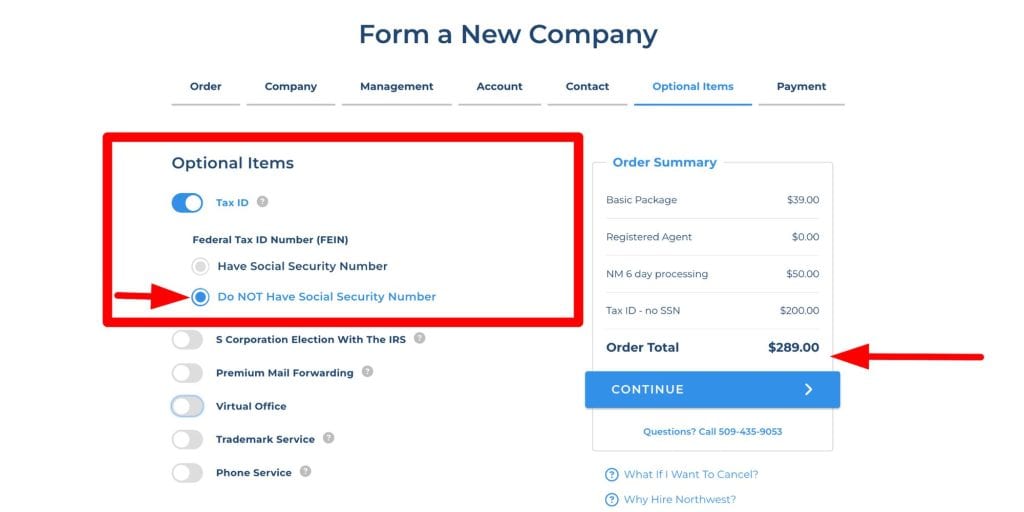
So you’ll only pick the Tax ID here; other things are additional upsell. For the phone service, I did a video on how to get one at an affordable price.
Step 6. Pay and Checkout
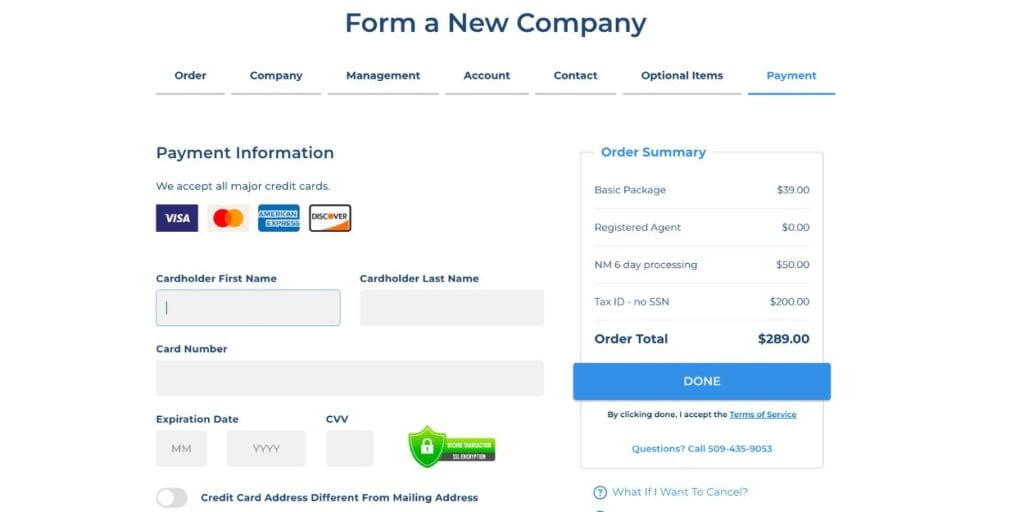
The last thing left here is to enter your card details, make the payment for your business registration, and get your EIN as soon as possible.
Frequently Ask Questions
Below are some of the most frequently ask questions about business formation with Northwest Registered Agent.
What Do I Fill In The SSN Section In My EIN Form?
Enter foreign in the box. While filling the form for your EIN, entering foreign means you’re a non-US citizen and you have no SSN or EIN yet.
How Do I Fill the Members Form Sent to Me by Northwest Registered Agent?
Simply enter your full name and enter your US address there. If your business is having more than one individual, enter your team members’ names and their US addresses.
Can I Use My Country ID to Verify My Stripe Identity Without Using A US ID?
Absolutely yes, while creating your Stripe account, you’ll see the option to select your home country and upload your government-issued identity card.
Opening a US Bank Account with Payoneer
This is very much easy since we have Payoneer for that. All you need to do is register with Payoneer.com, connect with Global payment service and you’ll be able to get your virtual US bank account.
Once this is done, you can now have your funds move from Stripe to Payoneer and cash it in your local currencies. It’s as easy as that.
However, to do this, you do need to access your Stripe account. From your account, you can proceed to the payout sections and add your Payoneer account number and that’s it, you’re all set up.
You are now a proud owner of a business in the US plus you also have a bank account. Isn’t that cool?
How To Open Your Stripe Account In Pakistan to Process Payments Online
You can watch the above video and see how you can set up your Stripe account.
Once your business LLC is registered, your business will equally receive a tax ID or EIN. Which is part of what we need to create your Stripe account.
To create your Stripe account, simply head over to https://dashboard.stripe.com/register and create your account.
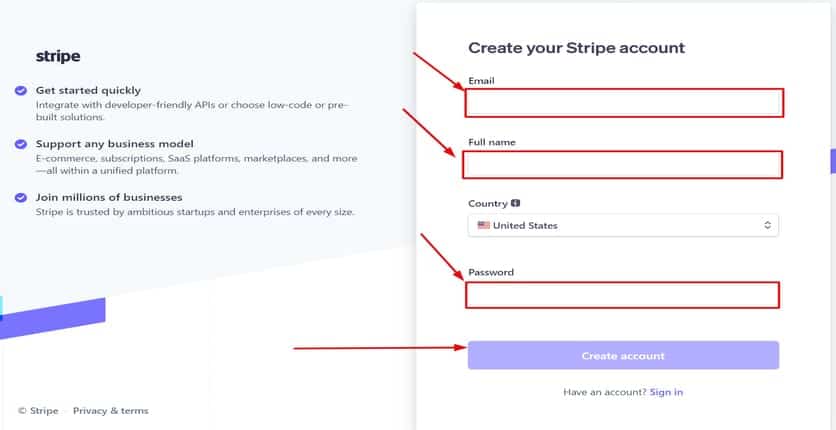
Enter your email address and full name and choose your country of business formation, which in our case is the United States.
After that, Stripe is going to send you an email prompting you to confirm your email address.
Once you receive the email, confirm it and proceed to activate your account.
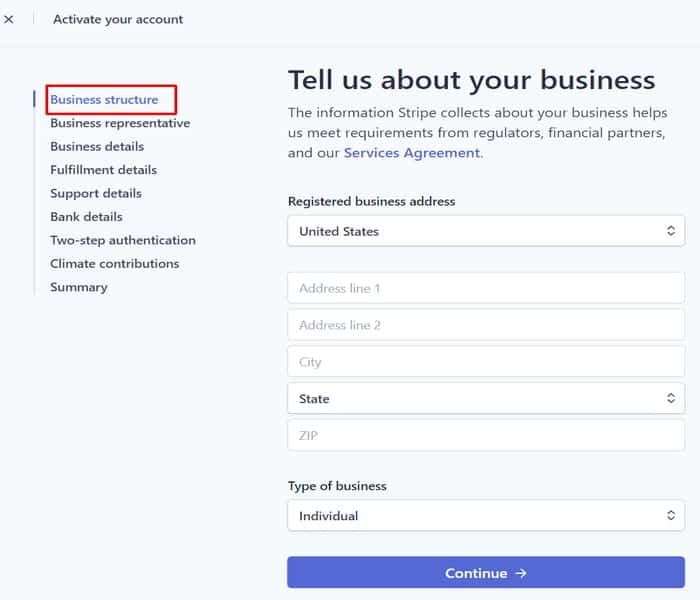
At this stage, you’ll need to give an account of your business detail by stating the full address and state where you formed the business in the US.
Also, you’ll need to specify the structure of the business. Specify if it’s:
- Individual
- Company
- Or Non-Profit Organization
After that, click the “Continue” button to proceed.
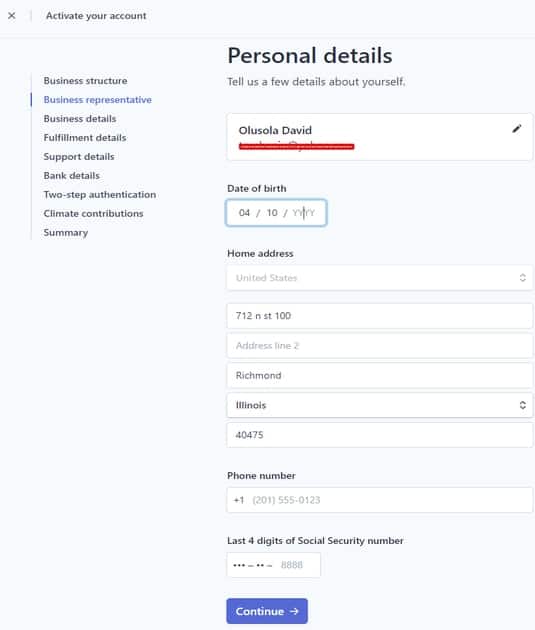
This is where you enter your personal details like email address, date of birth and house address.
At this point, you’ll be asked to enter the “Last 4 digits of Social Security number” since you don’t have, what you need to do here is enter “8888” or leave it blank.
If that still don’t work simple contact support and choose online chat https://support.stripe.com/?contact=true
Tell them you’ve just formed your business in the US and what you have is EIN and you don’t have the SSN.
They’ll work on it within a few minutes and give you’re the right code to use.
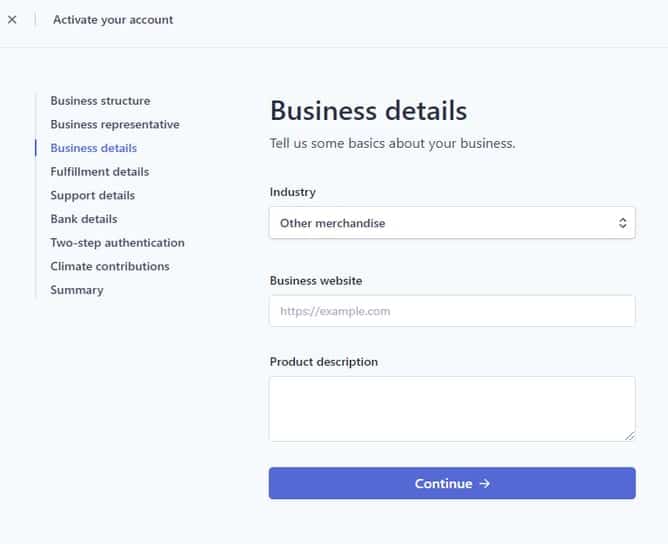
This stage is simply about your business, tell them about the nature of your business. If it’s going to be digital products or retails.
Once you’ve chosen the right one, enter your website URL and give a short description of what the product is all about.
After that, click continue and proceed to the next stage.
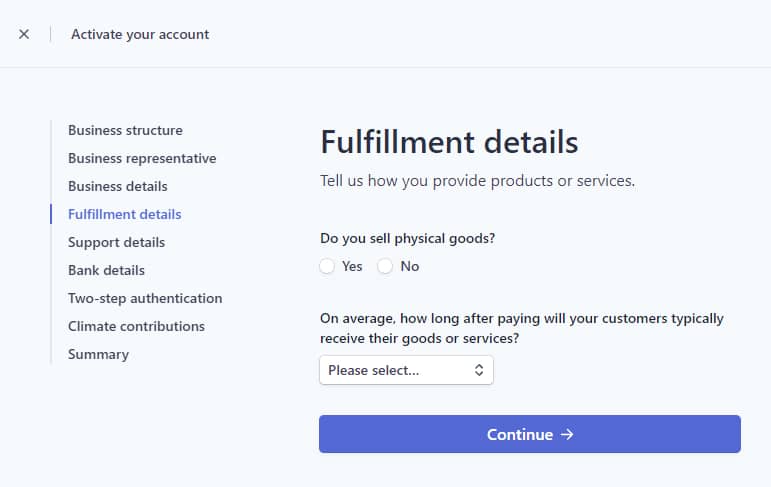
Here, you’ll need to specify if your product is going to be a digital product or a physical one. If it’s a digital product, you’ll need to choose how long it’s going to take you to deliver the product.
And if it’s a physical product, you’ll need to specify how you’re going to ship the product. Usually, what you should choose is “Product are delivered by a third party (Fulfilment House)”
Then choose “One Month” as to how long it’s going to take for your product to be delivered. After that, click the continue button to proceed to the next stage.
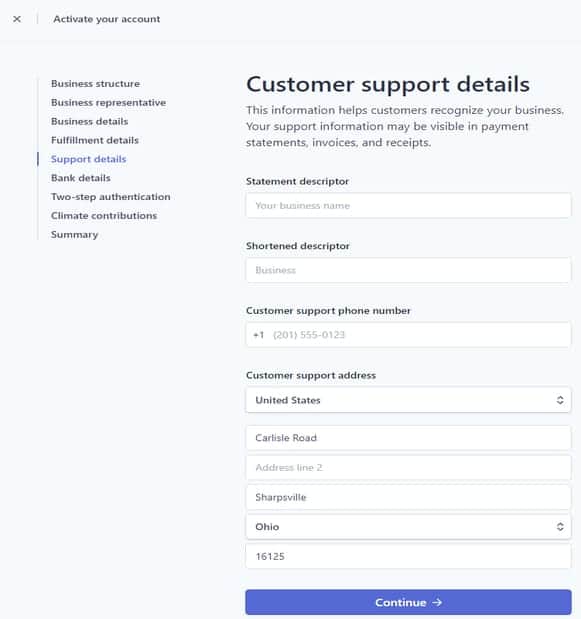
The next stage is the “Customer Support Detail”. This is simply where you’re going to write your statement descriptor.
That’s the name that will appear on your customer receipt after a successful payment to you.
After that, enter your customer support phone number and your customer support address. This can actually be your phone number and the same initial address you’ve used earlier.
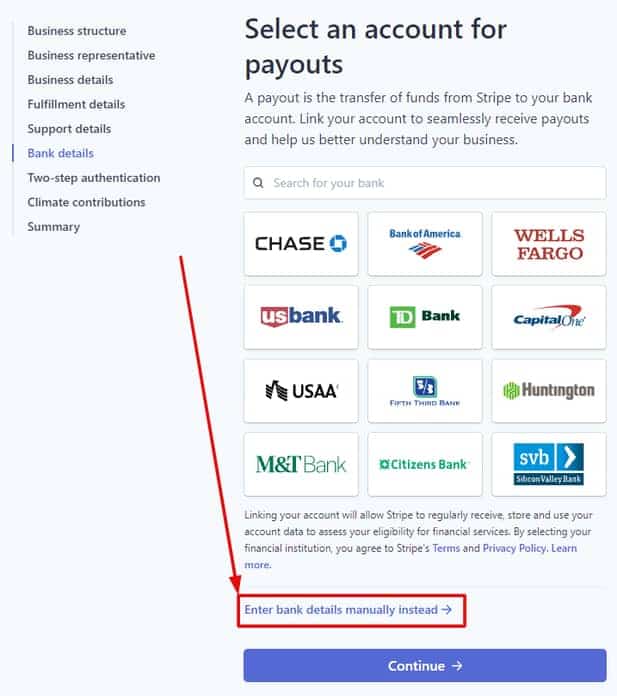
This is the stage where you’re going to enter your bank details. That is, where Stripe is going to send your money too.
As you can see from the image, scroll down and click on “Enter bank details manually instead”
After that, it going to pop up a small page as you can see from the image below. So, on this page, enter your routing number and account number.
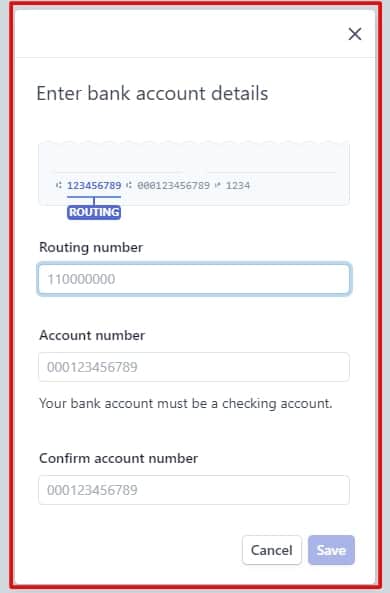
The next thing you want to do is click save and continue.
At the next stage, you’re going to be prompt to set up your 2-step authentication. Once done click on continue to proceed to the next level.
The next stage is where Stripe is asking you to contribute to climate change. If you want to you can just set a certain per cent that’ll be deducted from your money.
But if not, just click on “Not Now” to proceed to where you’re going to submit the whole of the application.
Now go to your dashboard, you’ll see that your verification status is currently at reviewing. So at this stage, your account should be approved in no time so far what you’ve provided are all the correct details.
Conclusion
With the above formation, you can now receive payment twice as you used to. If you have a PayPal business account this will also be an addition to it.
Your business is also fully legalized in the US in a real place and real state. I hope you find this very helpful.
That’s it on how to open a stripe account in Pakistan. What are your thoughts on this? Let me know them using the comment box!
![How to Open a Stripe Account in Senegal [100% Full Guide]](https://smartbizfreedom.com/wp-content/uploads/2023/12/Stripe-nepal-18-768x432.jpg)
![How to Open a Stripe Account in UAE [New Working Tutorial]](https://smartbizfreedom.com/wp-content/uploads/2023/12/Stripe-nepal-22-768x432.jpg)
![How to Open a Stripe Account in Lebanon [100% Easy to Open]](https://smartbizfreedom.com/wp-content/uploads/2023/12/Stripe-nepal-53-768x432.jpg)
![How to Open a Stripe Account in Haiti [Working 100%]](https://smartbizfreedom.com/wp-content/uploads/2021/10/stripe-in-Haiti.jpg)
