How to Start an Online Store in Nigeria – [Tutorial Guide]
Do you want to start an online store in Nigeria and make money passively? If yes then you might want to stick around to the end of this post.
In this article, you’ll learn how to create an online store in Nigeria and sell your products to make money online in Nigeria.
Be it digital or physical products (Mini Importation Business).
Don’t worry; I know creating an online store yourself may be a little scary especially if you are not techy.
But not to worry, we all started that way and the more reason I’ve come up with this post.
All that’s required of you now, is your undivided attention for the next few minutes to follow through- with this tutorial guide.
Choosing Your Online Store Platform In Nigeria
To successfully build an online store, you need to decide and choose the platform upon which your online store will be powered.
This is often the biggest mistake most people make by not choosing the right platform for their website.
The good thing is, you are here now. So you won’t be making the same mistake.
To begin with, I’m only going to recommend two of the most popular eCommerce platform, which of course is Shopify and WordPress.
Building Your Online with Shopify
Shopify is a complete and ready-made e-commerce solution that helps you to create an online store within few seconds to sell your goods.
With Shopify, you can easily customize your storefront, accept credit card payments, organize your products and finally, track and respond to orders.
All these will be accomplished with just a few mouse clicks.
Why Shopify is such a popular e-commerce platform owes to the fact that anybody can sell online with Shopify be it techy or novice.
All you need to do is sign up and the Shopify wizard will take you through the whole process.
What could be the downside to Shopify may be their monthly recurring fee of $29 for the basic plan. Although this might not be an issue since you will be making more from your online store.
But if you feel you can’t go with the price, I guess you need to stick around as I put you through the whole process of setting up an online store with WordPress through the WooCommerce plugin.
To learn more about Shopify, their plans and subscription price in Nigeria, payment gateways etc.
Then see my Complete Shopify reviews in Nigeria.
Building Your Online Store with WordPress/WooCommerce Plugin
At the end of this tutorial, your online store should look somewhat similar to the image below. although it might vary depending on what you want to sell.
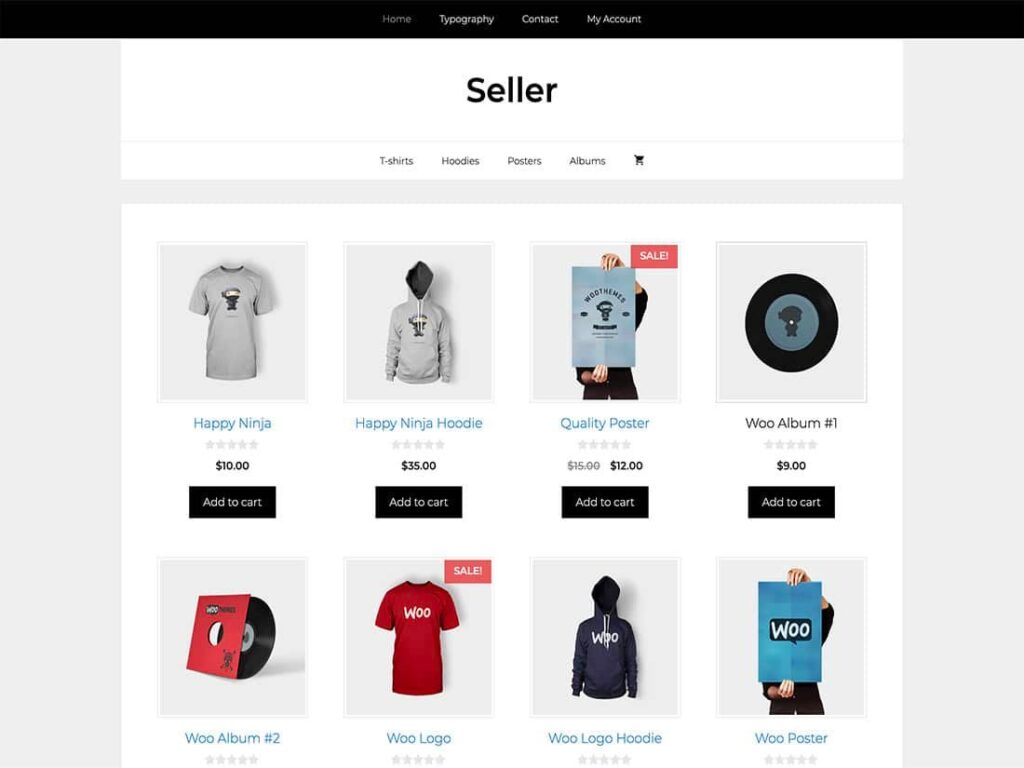
Most users prefer building their online store with WordPress and the WooCommerce plugin because of its flexibility.
Using the WordPress platform will save you some cost compare to Shopify. Though it requires some time to set it up, it is worth doing for the long run of your website.
What are WordPress & WooCommerce?
I guess some might not really understand the relationship between WordPress and WooCommerce. Let me clarify that so this tutorial can be a smooth class.
WordPress is an online open-source website creation tool that’s written in PHP.
WordPress is probably the most flexible blogging and website (CMS) content management system for users just getting started.
WooCommerce, on the other hand, is a free WordPress plugin that adds e-commerce functionality to your website.
The plugin is specifically built for WordPress to allow you to create a beautiful online store with just a few clicks.
In summary, WooCommerce is the simplest and best way to turn your WordPress or existing WordPress website into a fully functional e-commerce website. In other words, an online store so to speak.
What Can You Sell Using WordPress + WooCommerce?
You can use the platform to sell your product if your industry falls into the categories but not limited to:
- Jewellery and accessories
- Electronics
- Toy and games
- Craft and books
- Digital products
- Clothing and fashion
- Food and beverages
- Art and photography
- Furniture and household
- Services
- Subscription-based website
- Other people’s products (Dropshipping)
- Bookings etc.
Basically, you can say WooCommerce allows you to sell anything with a price tag on it.
How to Start Online Store in Nigeria with WordPress/WooCommerce
To successfully set up your online store in Nigeria you need the following:
- Domain name
- Web hosting
- SSL certificate
A domain name is the road map to your online store on the internet.
In other words, your website address, and your domain name will be what your users or customers will type in their browser to reach your website.
Your web hosting, on the other hand, is where your website lives on the internet.
It’s more like a remote server that keeps your website data and also makes it accessible to whoever wants to visit your website.
Think of it as the house your website is living on the internet while your domain name is the address to that house.
SSL is an abbreviation for Secure Sockets Layers. Its encryption protocols are used to secure the exchange of information on the internet.
Simply put, it adds a security layer to your website. This will allow accepting sensitive information such as credit cards and other personal information.
Every online store needs an SSL certificate to accept credit card payments on their website.
Step 1: Get a Domain Name & a Web hosting
So, how can you get your domain name and your web hosting account plus your SSL certificate?
You only need to pay for web hosting and you’ll get the rest for free. To get all that, I’ll recommend BlueHost!
Why Bluehost?
Well, Bluehost is a large reputable and reliable hosting company when it comes to building a website.
Plus they’ve been in business for a very long time and they currently host over 2 million websites and 850,000 blogs across the whole world.
Their server is crazily fast and they save money. In short, below are the reason why you should consider BlueHost while starting your online store in Nigeria:
- 30 days money back guarantee
- Free Domain name
- Great customer support 24/7
- Free SSL certificate
- 99.9% Uptime Guarantee
- Established hosting company
- Officially recommended by WordPress.org
- Pre-installed WordPress & WooCommerce
The best part is if you have any issue you can call them or chat them up and they’ll have everything fixed for you.
So, you don’t have to worry about knowing coding or HTML.
Now, let’s get your e-commerce business in Nigeria a website. What you need to do now is head over to Bluehost.com.
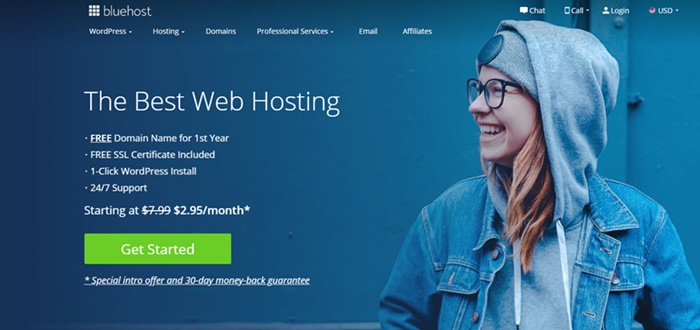
Once at the homepage, click the “get started” button to continue.
After that, you’ll need to choose a hosting plan.
You can start with the basic plan since it’s a new website. You can always increase it in the nearest future as your business grows.
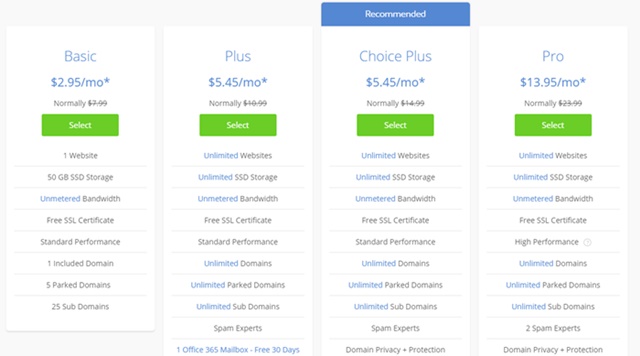
The next is to choose your domain name. Getting a domain name with Bluehost is always free.
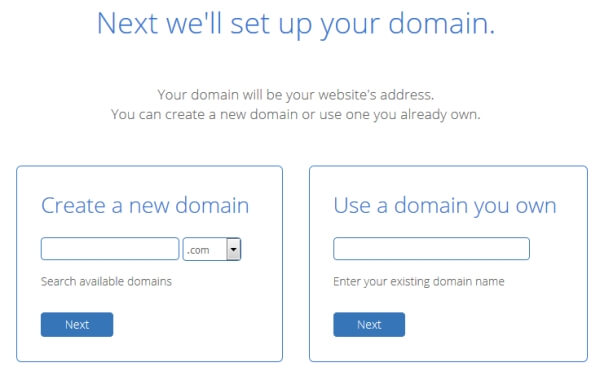
The small box with the “drop-down menu” will allow you to choose either “dot com” or “dot net” etc. and if peradventure you have a domain name already just choose the second box on the right-hand side.
Also, if your domain name is from another provider you’ll need to point the Nameservers to Bluehost.
If you don’t know how to do this you could chat up the support and they’ll put you through or simply get a new domain name since it’s free.
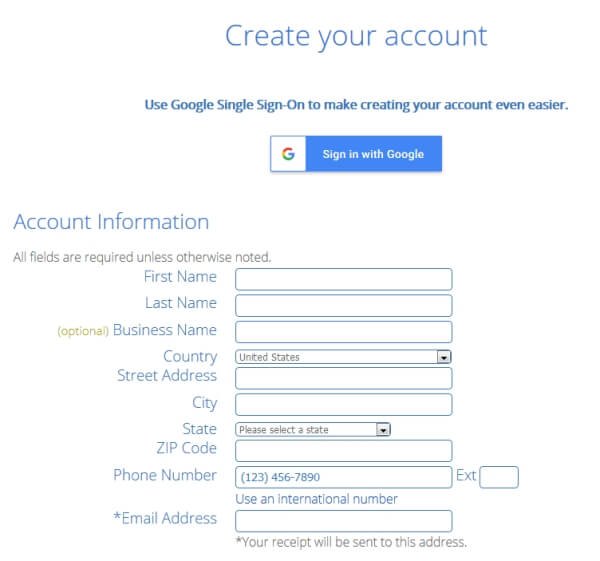
Once that is sorted out, you’ll need to create an account with BlueHost. You can easily do that by filling out the form as appeared in the image below.
After this is the package information. From the account plan, you can always choose your plan based on your budget.
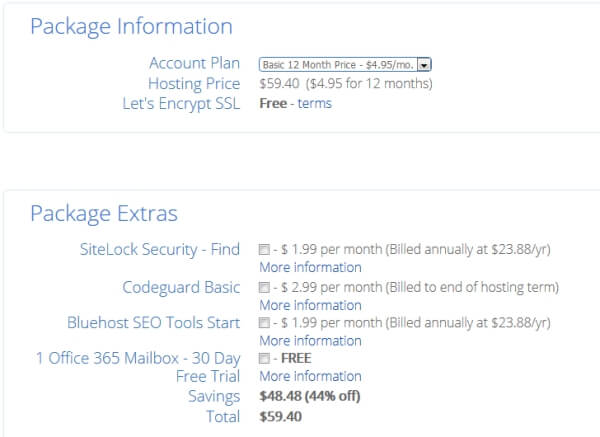
You can choose from 12, 36, or 60-month straight subscription. The higher the months the lower it becomes. However, this all depends on the size of your budget.
You don’t need to check the additional boxes except for the “Domain Privacy Protection’. The rest is just unnecessary additional costs.
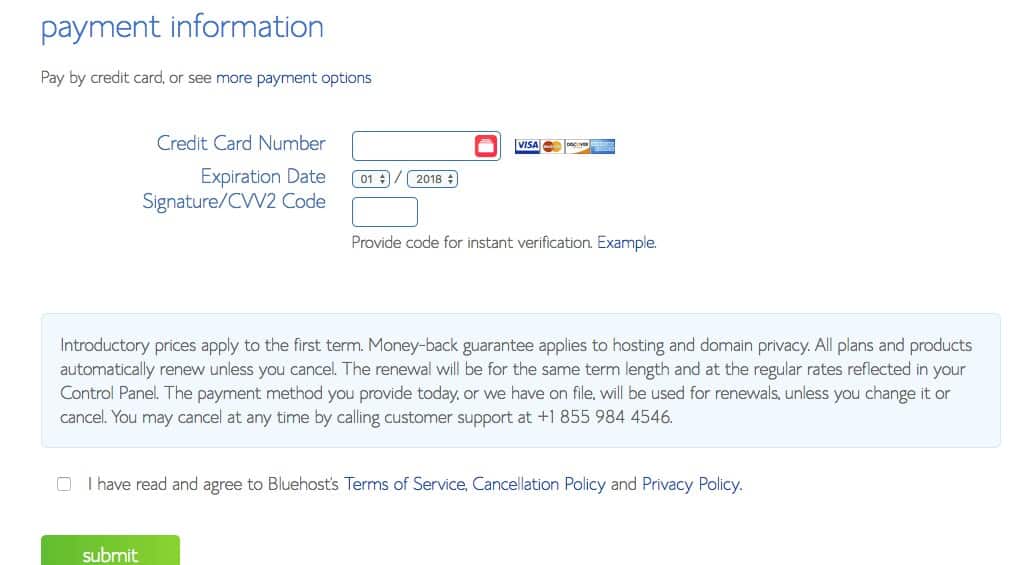
Finally, enter your payment information to secure your package. After that, scroll down and tick the terms of service to agree, then click the submit button.
That’s it, you’ve just gotten your domain name and a web hosting account for your website.
If your domain name was gotten from BlueHost, you should receive a notification from them asking you to verify your domain, if not, the domain name might get cancelled.
Step 2: Install WordPress and WooCommerce Plugin
Now, starting your online store in Nigeria is just getting more interesting.
Gone are the days when you have to write scripts and code from the beginning to build an Online store in Nigeria.
These days, with the advent of WordPress, you can easily start your online even though you know nothing about web development.
You just have to find a template and run with it.
What you need to do now is install WordPress, then after that, install the WooCommerce plugin to build your online store website.
The good thing about Bluehost is that after the checkout page the WordPress is automatically installed for you!
You don’t have to worry about having experience with WordPress development or not.

After the checkout page, BlueHost must have notified you to create a password for your account.
Once you’ve successfully done that you can then log in with your account details.
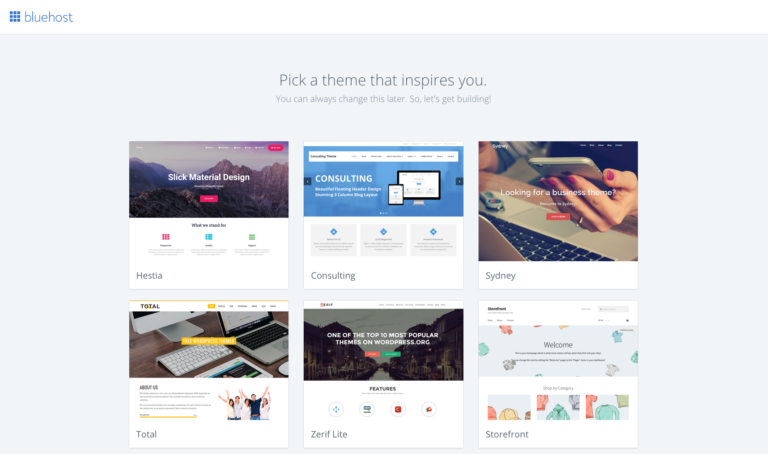
Immediately you log in, BlueHost is going show you some free WordPress theme to choose from.
You don’t need them so there’s no point in choosing one, you can skip that by clicking the button under the page.
On the next page, you going to see a “Welcome to WordPress” with a question under asking if you need any help. Click I don’t need.
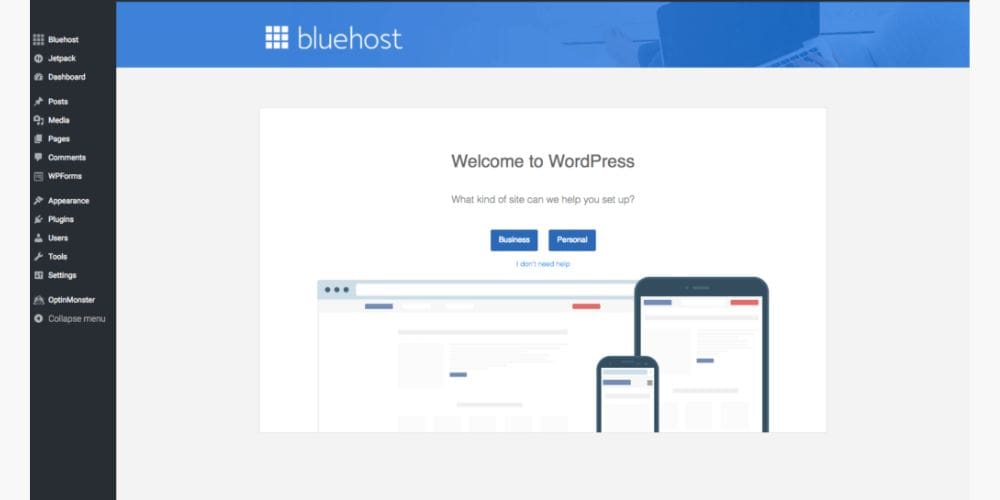
Next, log in through your cPanel, BlueHost must have sent you your account details to your registered email address or there should be another tab opened for your cPanel already on your browser.
Once you’ve login, click my “my site” on the left-hand side to set up your WordPress account.
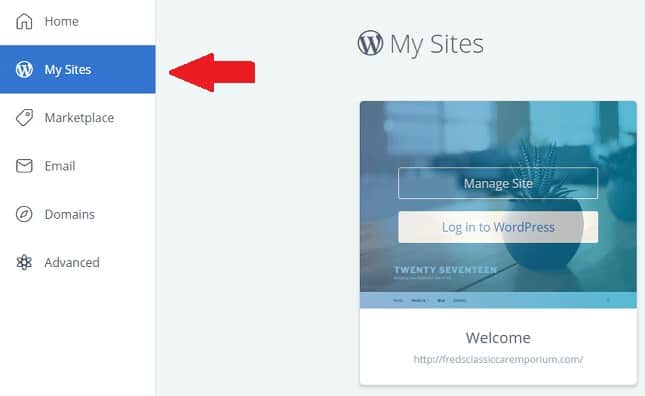
It’s a few simple set up procedure. Once you’ve done that you now have a fully functional WordPress site.
WooCommerce Installation
The next procedure is now to install the WooCommerce plugin which will enable you to build an online store website.
To do this, login into your WordPress admin dashboard. You can do this by going to your “ .com/Wp-admin”.
Or login directly from your Bluehost account.
Once you’ve logged in, at the left-hand side go to plugins then click on add new.
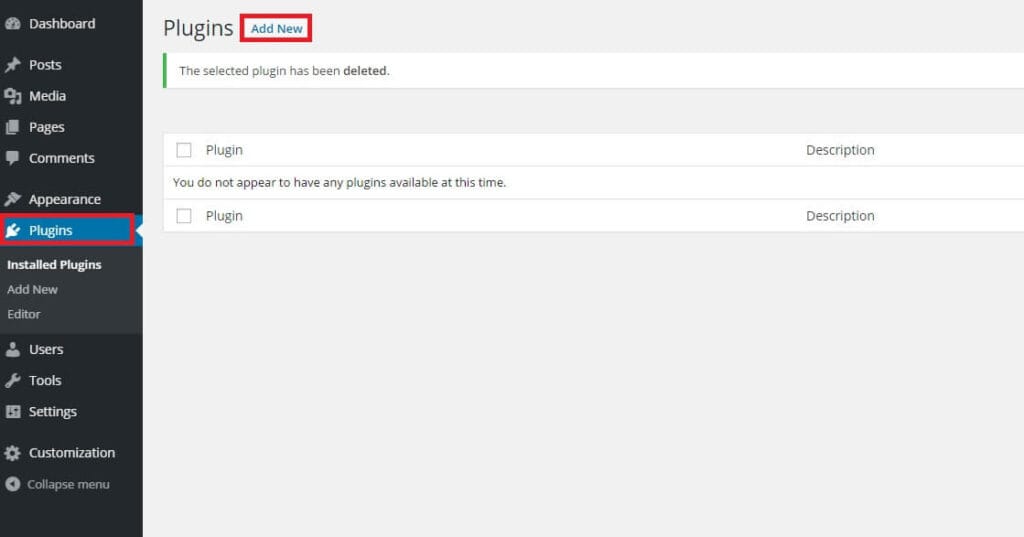
After clicking the “Add New” button. Enter “WooCommerce” in the keyword tab.
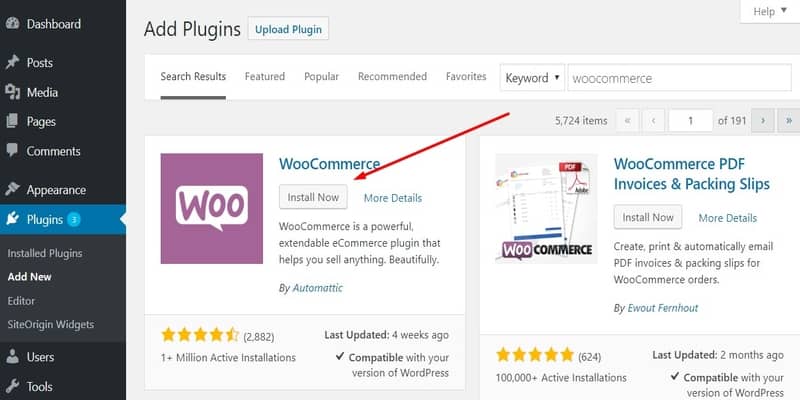
Click the “Install Now” button to install the plugin once install click the activate.
After this, you’ll see the WooCommerce on-screen set to set up your e-commerce website. All you need to do is just follow it a step at a time.
This page, being the first page will ask for your location, choose the country of your choice and your country currency.
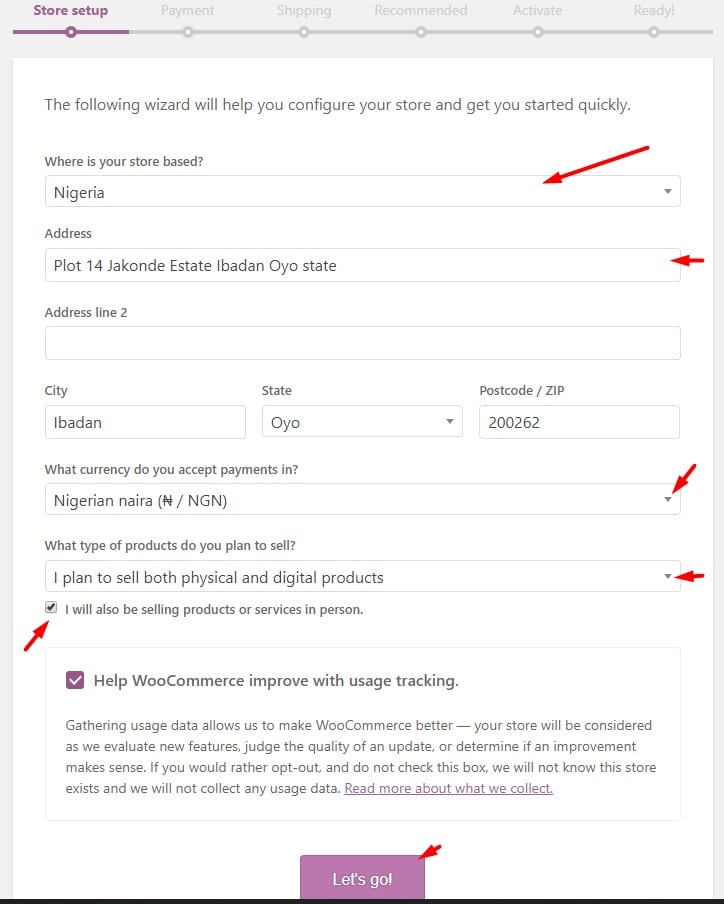
Additionally, if you scroll down, you’ll need to choose the kind of products you want to sell and if you’ll be selling in person.
You might need to tick the “I will also be selling products or services in person” since you might be running a payment-on-delivery service.
The next page is the payment option.
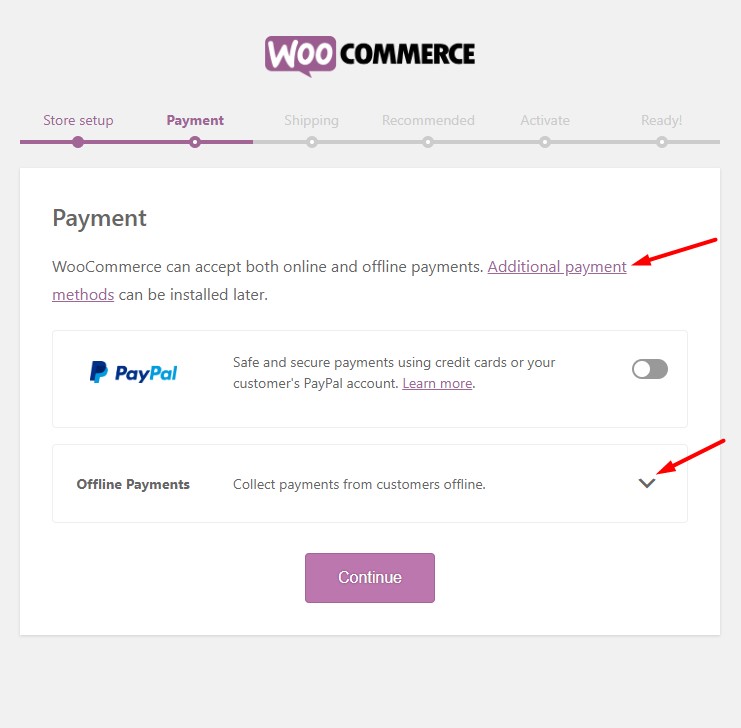
You don’t have to worry if your payment gateway is not there, you could always add and install them later.
The offline payment method will allow you to receive payment via bank transfer, payment on delivery etc.
You could go through this list of e-commerce payment gateway in Nigeria to add your payment gateway later.
The next page is the shipping page.
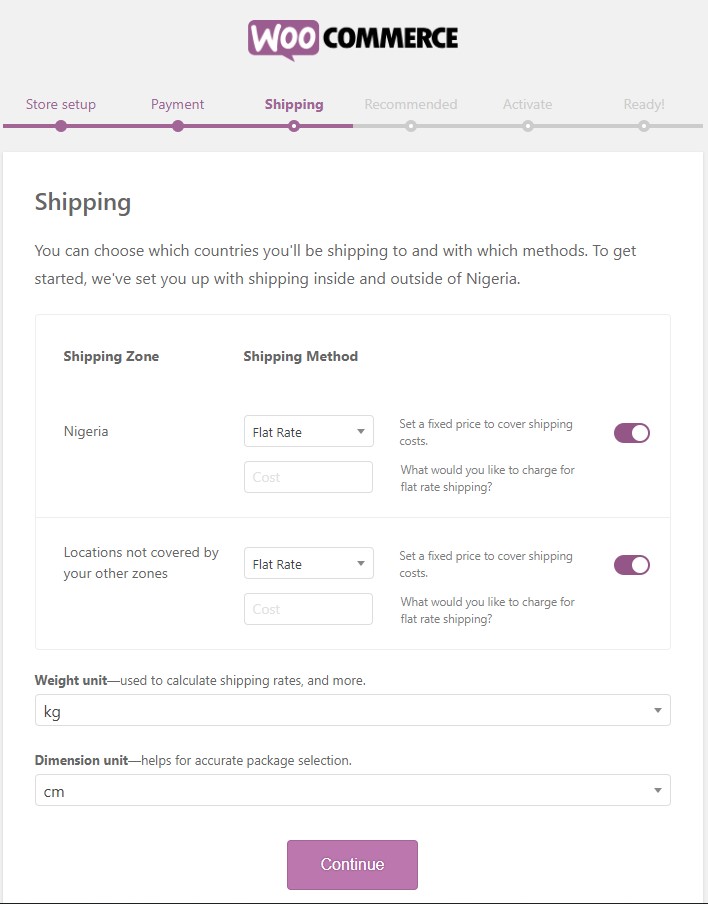
At this page, you can select the price you want to charge for the shipping of products.
You don’t necessarily have to do that now if you don’t know yet, you can always do that later.
The next page is the recommended tool for your e-commerce website you can skip if you don’t them.
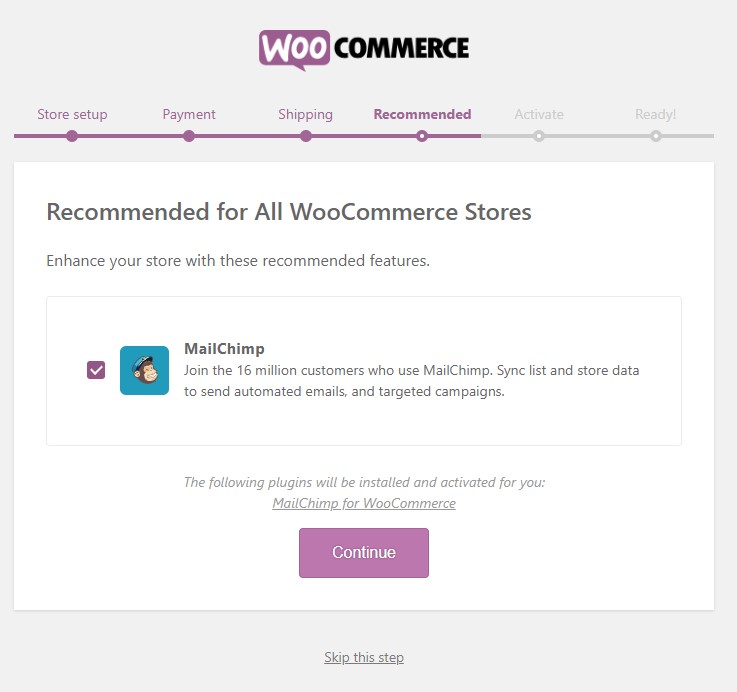
MailChimp for WooCommerce is an email marketing software that can be used to send newsletters to your subscribers or notify your customers of any promo you’re doing etc.
If you have other email marketing software in mind you could uncheck the MailChimp box and install the other one later.
The next page will ask you to connect your website with Jetpack plugin for your site enhancement.
Once you’ve done that your website is ready to start selling.
This is the last page you’ll see.
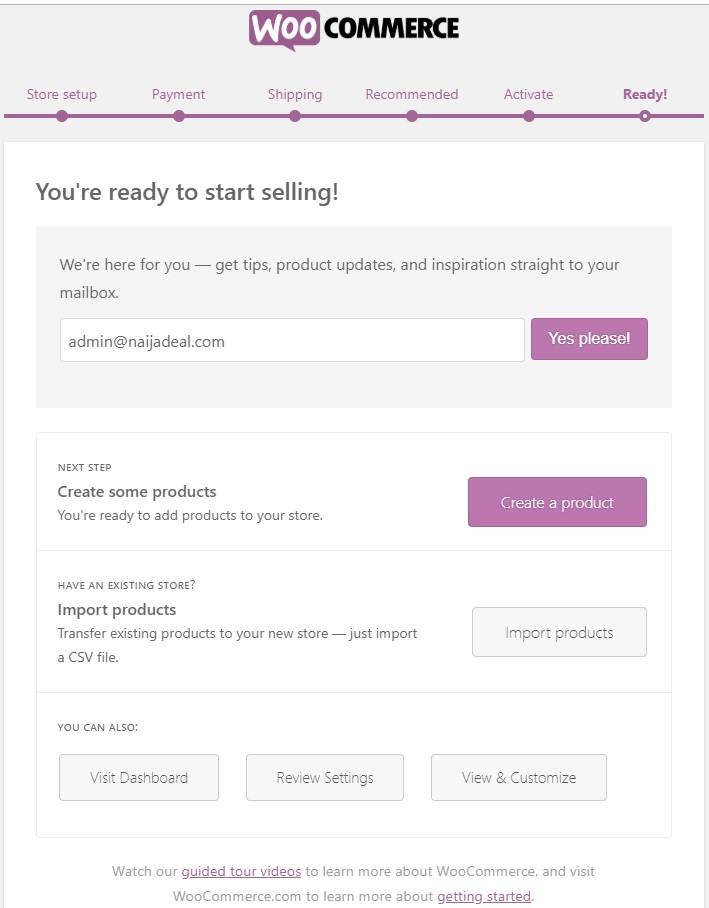
You can click the “create a product” button to upload your first product or simply return to your dashboard.
Step 3: Customize Your Online Store Theme
The theme you used determines the looks of your WordPress site to your users and when it comes to WooCommerce it also determines how your products are being displayed.
Normally, the WooCommerce plugin must have installed its default theme on your website, Storefront.
To customize the theme, go to Appearance => Customize. This will allow you to see the front end of your website as you customize it from the inside.
With this, you can edit to your taste and if peradventure you didn’t like the theme you can visit ThemeForest.com to check out varieties of beautiful premium themes for your e-commerce website.
Once you’ve got a new theme, you going to need to upload it to your website.
To do this, head over to Appearance => Themes.
Next, click the “Add New => Upload Theme” to upload the theme file of your premium theme.
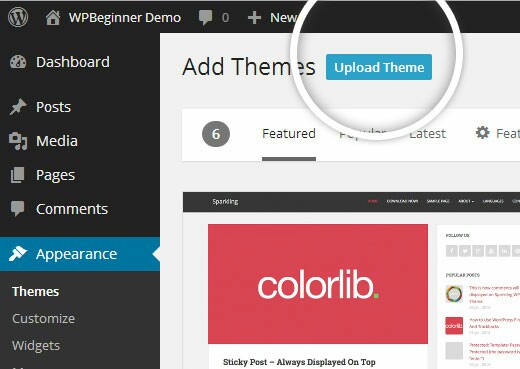
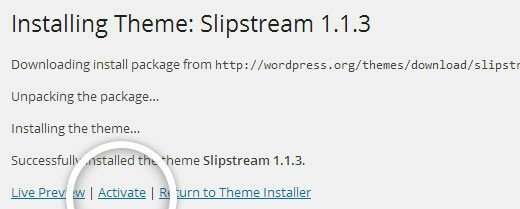
After this, you’ll need to choose the file from your desktop in other to upload it. Once it’s uploaded successfully, click “activate” to activate the plugin.
Step 4: Add Your First Product
Once everything is in place, you’ll need to publish your first product to bring your website live.
To do this, go to Products => Add Product.
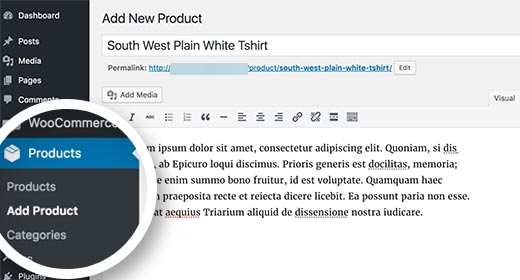
You’ll need to give the product a title and some detailed description.
On the right-hand column goes the product categories box.
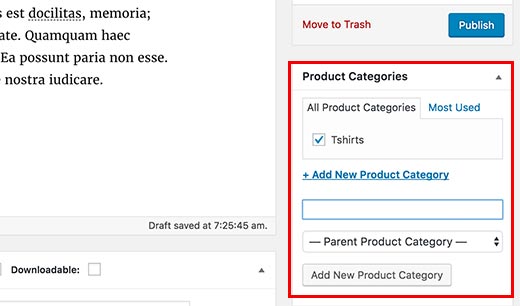
To add a new category for your product, click on “Add New Product Category” which is the last button inside the box.
If you scroll down the product page, you will see the product data box where you will provide further detailed information about the product.
Information like the price of the product, product inventory, shipping of products etc.
Below this product data is where you can add a description of the products. This description will be shown when users are viewing multiple products on your website.
Finally, on the right-hand column, you’ll see boxes to add the main product image and as well as the product gallery.
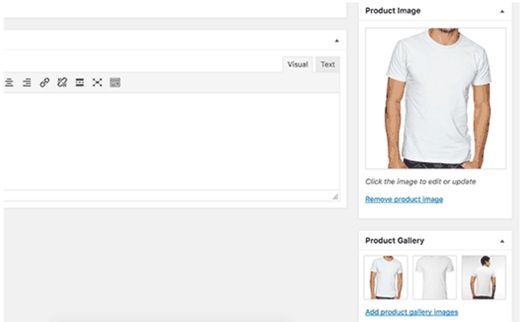
Once you feel you’ve written everything you should about this product, click the blue “Publish“ button to make it live on your website. Just keep repeating the process to add as many products as possible.
Step 5: Add Few Further Plugins & Extension
While WooCommerce is such a better tool to build an e-commerce website or an online store in Nigeria owes to the fact that you can easily install free other plugins to supercharge your website.
below are further recommended plugins you can install on your website.
- Yoast SEO – This is a powerful plugin that any WordPress site owner should have. The plugin helps improve your Google search appearance.
- UpdraftPlus – Using this plugin gives you the ability to easily back up your site content. Every detailed information on your website should be constantly backed up.
- W3 Total Cache – This help to speed up your website and allows for better user experience through the speed of your website.
- Force Regenerate Thumbnail – The plugin helps to resize your product images and allow your website to load more faster.
Final Thought on How To Start Online Store in Nigeria
As you can see, it’s not as difficult as it seems all you need to do is take it one step at a time. Here’s the summary of everything you need to do on how to start online store in Nigeria.
First, get a web hosting account and a free domain name with BlueHost, once your account is set up, WordPress must have been pre-installed, you just need to install the WooCommerce plugin to start adding products to your website.
After that, the need thing you need is a nice-looking online store theme for your website. For that, you need to do is visit ThemeForest here.
So that’s it on how to start an online store in Nigeria. Do let me know what you think using the comment section.

![How To Use Shopify In Pakistan [The Complete Guide]](https://smartbizfreedom.com/wp-content/uploads/2023/09/Pakistan.jpg)
![Best 15 Online Advertising Platforms In Nigeria 2025 [Free & Paid]](https://smartbizfreedom.com/wp-content/uploads/2020/03/Untitled-design-7.jpg)

![How To Use Stripe For Art Commissions [Step By Step]](https://smartbizfreedom.com/wp-content/uploads/2022/07/oberlo-vs-Salehoo-22.jpg)

![How To Use Shopify In Cambodia [The Complete Guide]](https://smartbizfreedom.com/wp-content/uploads/2023/09/Shopify-Cambodia.jpg)