
How To Use Stripe For Art Commissions [Step By Step]
You reading “how to use stripe for art commission” mean you’ve taken the step to start earning with your artwork.
Heck, it’s normal for every artist at some point in their life.
But after you’ve decided to start doing art commission you still find it difficult to get paid easily.
Trust me there’s nothing to worry about because you’re not the only person in this shoe. There are so many reasons you could be finding it difficult to get paid.
A good example might be because you’re under 18 or because of other payment methods issues.
But for any of the reason, don’t give up because there’s always a light at the end of the tunnel.
In the case of Stripe, however, I’ll show you how to use Stripe for your art commission and get paid easily.
Let’s get started, shall we?
What is Stripe? (Understanding How It Works)
Stripe is a US-Irish financial services and SaaS company with dual headquarter in Dublin, Ireland and San Francisco, United States.
The company is a payment platform that large-scale and small-scale business owners can use to accept payment for their business.
You could also use stripe in person for payment as a point-of-sale system aka (POS).
You could charge your client or customer with their pay later service or buy now with credit cards or through invoicing.
However, you do need to understand that you’ll pay Stripe for facilitating every transaction between you and your customer.
The fees charged by Stripe vary by the transaction type; for example, every successful online payment costs 2.9% plus 30 cents, whereas for POS it’s 2.7% plus 5 cents.
How To Use Stripe For Art Commissions
There are a few ways to use Stripe for art commissions. The first one is through:
- Invoice Request
- Online Checkout
So, it totally depends on how you want to get paid.
But mind you, there are certain requirements that need to be met for you to be able to use Stripe for your Art Commissions.
For now, let’s properly discuss the two ways to use Stripe for art commissions.
#1. Invoice Request
Using the invoice request is quite easy and most affordable for anyone that wants to use stripe for art commissions.
This is easy because there’s no sophisticated process to it. All you must do is determine how much you’ll be charging for the commission you want to do and send an invoice in respect to that.
Although there must have been a bargain and agreement between both parties invoiced.
So once an agreement is reached, you can easily go ahead and send the invoice to your customer.
One of the good things about using Stripe invoices for art commissions is that you can charge your customer instalments.
Based on the agreement, he/she could pay the 50% initially and automatically pay the balance once the job is completed.
#2: Online Checkout
The second method which is online checkout is a bit more sophisticated compared to the first one.
Using Stripe online checkout for your art commission means you must have a website where your customer can check out.
This is unique because you can use it to brand yourself. If you happen to be the artist that does similar commissions, you could list it on your website as part of your product or services.
In this case, the first thing you want to do is get yourself a domain name and a web hosting account to set up your website.
They are one of the best platforms out there that you can use to set up your website.
Plus, it comes with a free domain name. This way, you won’t have to pay extra costs for your domain.
You can check it out here, Bluehost comes with a 30days money-back guarantee.
So, once your website is set up, you can then integrate Stripe on it and customers will be able to check out their art commissions.
Alternatively, there is how to use stripe for art commissions on Etsy, Shopify etc.
All you simply need to do is create an account on these marketplaces and will be able to pay for art commissions on the platform.
Mind you they all come with an extra charging fee.
Requirement For Using Stripe For Art Commissions?
The requirement to use Stripe varies based on your country of location.
As you already know, Stripe is only allowed in the US, UK, Canada, and some handful of country.
If you happen to live outside the US, read this post for non-US citizen stripe creation.
It covers a lot on how to create a stripe account as a non-US citizen. It perfectly works the same way, so there’s nothing to worry about.
So here’s the requirement for those in the US:
- Business formation (LLC)
- Bank Account
- Product or Service you’re selling
- SSN
- Phone NO
If you don’t have a business registered already, I used Inc Authority to form mine.
You can use them as well.
They are one of the best companies when it comes to business formation in the US.
With over 4.8 reviews on Trustpilot you have nothing to worry about. Plus, you get to also earn 100 to $500 bonus with them.
How To Create a Stripe Account For Your Art Commissions
Once your business LLC is registered, your business will equally receive a tax ID or EIN. Which is part of what we need to create your Stripe account for your art commissions.
To create your Stripe account, simply head over to https://dashboard.stripe.com/register and create your account.
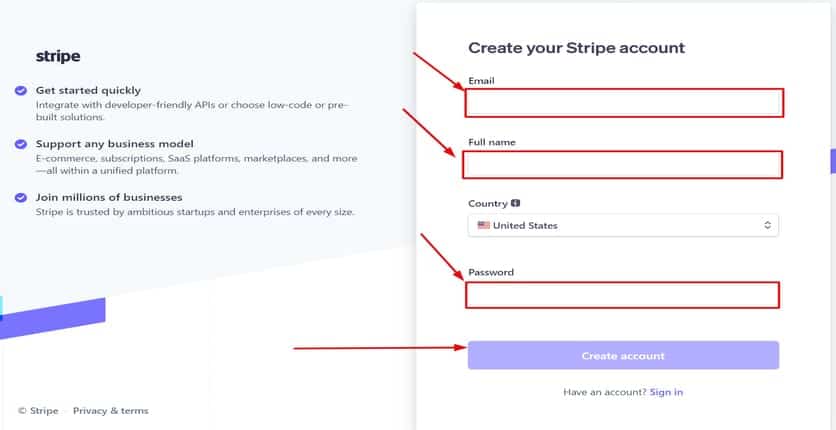
Enter your email address and full name and choose your country of business formation, which in our case is the United States.
After that, Stripe is going to send you an email prompting you to confirm your email address.
Once you receive the email, confirm it and proceed to activate your account.
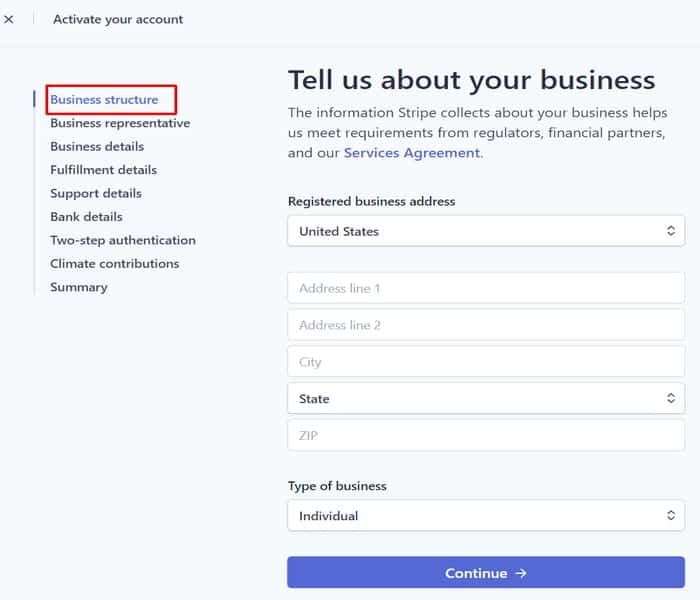
At this stage, you’ll need to give an account of your business detail by stating the full address and state where you formed the business in the US.
Also, you’ll need to specify the structure of the business. Specify if it’s:
- Individual
- Company
- Or Non-Profit Organization
After that, click the “Continue” button to proceed.
The next stage is where you enter your personal details like email address, date of birth and house address.
At this point, you’ll be asked to enter the “Last 4 digits of Social Security number” if you don’t have, what you need to do here is enter “9999” or leave it blank.
You can use this video to learn more about it.
This stage is simply about your business, tell them about the nature of your business. If it’s going to be digital products or retail.
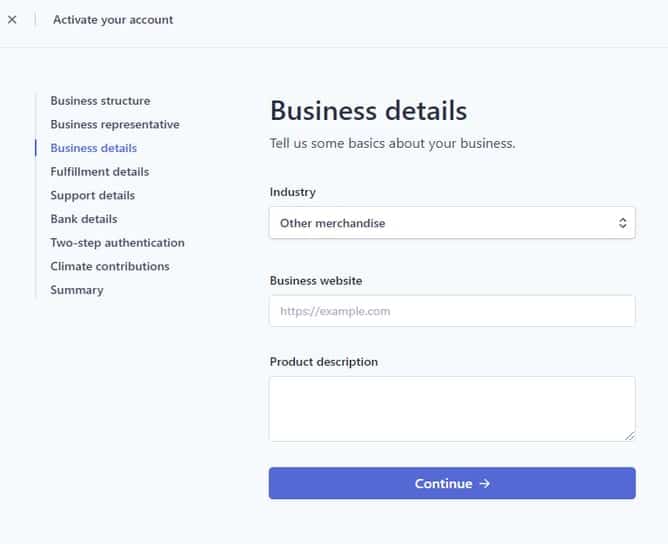
Once you’ve chosen the right one, enter your website URL and give a short description of what the service is all about. If you don’t have a website yet, Use Bluehost to set one up easily.
After that, click continue and proceed to the next stage.
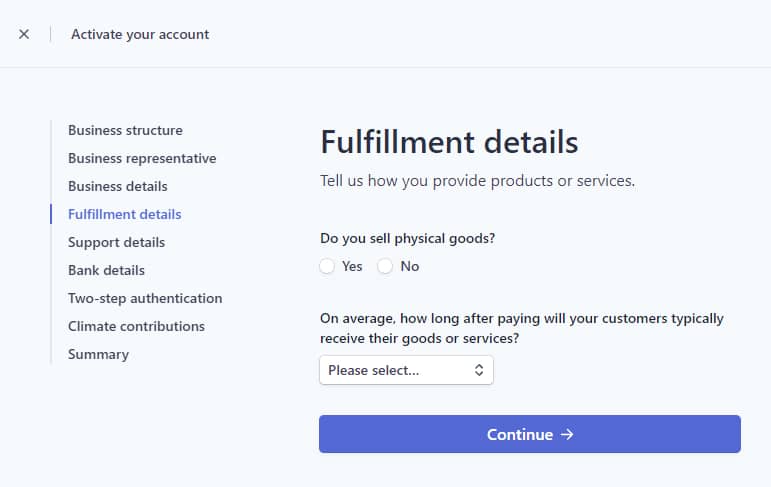
Here, you’ll need to specify if your product is going to be a digital product or a physical one. If it’s a digital product, you’ll need to choose how long it’s going to take you to deliver the product.
And if it’s a physical product, you’ll need to specify how you’re going to ship the product. Usually, what you should choose is “Product are delivered by a third party (Fulfilment House)”
Then choose “One Month” as to how long it’s going to take for your product to be delivered. After that, click the continue button to proceed to the next stage.
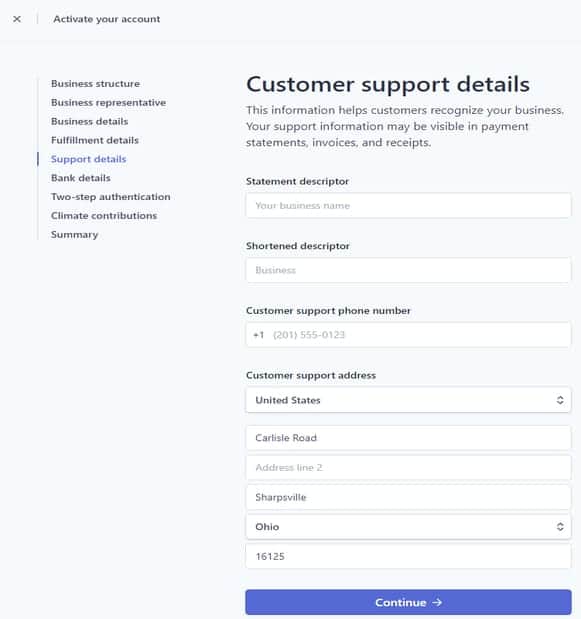
The next stage is the “Customer Support Detail”. This is simply where you’re going to write your statement descriptor.
That’s the name that will appear on your customer receipt after a successful payment to you.
After that, enter your customer support phone number and your customer support address. This can actually be your phone number and the same initial address you’ve used earlier.
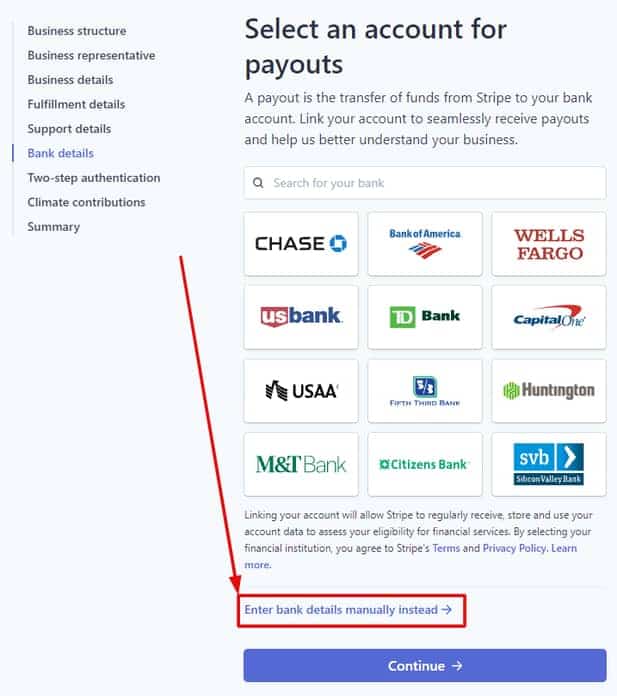
This is the stage where you’re going to enter your bank details. That is, where Stripe is going to send your money too.
As you can see from the image, scroll down and click on “Enter bank details manually instead”
After that, it going to pop up a small page as you can see from the image below. So, on this page, enter your routing number and account number.
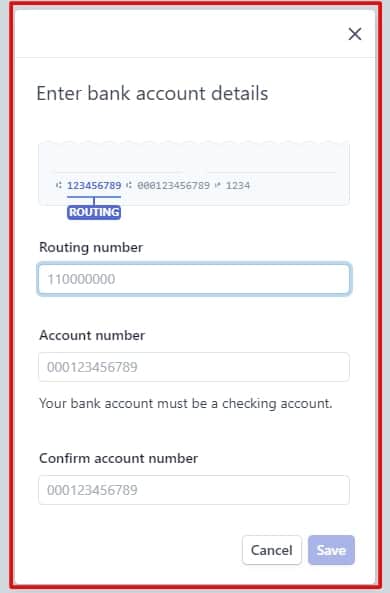
The next thing you want to do is click save and continue.
For those that don’t stay in the US too, you can easily use Payoneer to create a US bank account and withdraw your money to your local bank account. This is pretty much how you can create a Stripe account and use it for your art commissions.
Pricing Your Art Commissions
When it comes to pricing your art commissions this can be tricky. But while at it make sure you don’t undersell yourself.
Have it at the back of your mind that you’re not just selling a product, you’re also selling your time.
So it won’t be worth it if all those hours of work go into wasted effort.
A good rule of thumb is to calculate the total hours it took to create the piece. This will help while charging for your commission price.
You could also use this calculator as a template for creating a price for what you will charge your client.
Finally, the more clients you get the more confident you become. So increasing your price here, shouldn’t be a big deal right?
Conclusion
A quick recap on How to use stripe for art commissions, the first thing you must do is make sure you meet all the stripe requirements.
This includes:
- Having a website (Bluehost)
- Registering a Business (Inc Authority)
- And having a US bank account
As I said earlier, if you are not in the US, you can use Payoneer to create your US bank account.
Once you’ve met all these requirements, you can then go ahead and create your stripe account and use it for your art commissions.
That’s it on how to use Stripe for art commissions. Do let me know what you think about this using the comment section.
![How To Make Money Online With Jumia [Step By Step Guide]](https://smartbizfreedom.com/wp-content/uploads/2022/08/jumia-make-money-768x432.jpeg)
![How to Start Mini Importation Business in Nigeria [2025]](https://smartbizfreedom.com/wp-content/uploads/2022/08/Image-30.jpg)
![How to Start an E-commerce Business in Nigeria [Full Guide]](https://smartbizfreedom.com/wp-content/uploads/2022/08/Image-35.jpg)
![How to Start Drop Servicing Business in UK [Step By Step]](https://smartbizfreedom.com/wp-content/uploads/2022/05/oberlo-vs-Salehoo-3.jpg)
![Online Business That Pays In Nigeria [Daily, Weekly & Monthly]](https://smartbizfreedom.com/wp-content/uploads/2020/04/online-business-that-pays-in-nigeria.jpg)
![How to Start an Online Store in Nigeria – [Tutorial Guide]](https://smartbizfreedom.com/wp-content/uploads/2022/09/Untitled-design-35-768x365.jpg)