
How to Build an eCommerce Website in Nigeria [2025]
In this tutorial on how to build an e-commerce website in Nigeria, I’ll cover all the basics there is to know. So, even if you are a complete newbie, there’s nothing to worry about.
I’ve got you completely covered.
I need not tell you how e-commerce business is trending all over the world and even in Nigeria.
The rate at which online shopping in Nigeria is increasing is very alarming, so starting your own e-commerce business in Nigeria might just be your best move.
However, to start an e-commerce business in Nigeria, you need a professionally built e-commerce website.
This could be like the popular online stores in Nigeria or like the Jumia online shopping website.
Whichever is it all depends on what you want to sell on your e-commerce website?
Learning how to start an online store in Nigeria or learning how to create a website like Jumia is actually not difficult.
These days everything has been made simpler.
You just have to follow a template and run by it. There are many website designing companies which will customize your website at reasonable rates.
Learning How to build an eCommerce website in Nigeria
There are 3 major components that make a normal or regular website different from an e-commerce website. They include:
- Product Page
- Shopping Cart & the
- Checkout Process
Without these 3 components, your website is just like a regular and everyday website.
So, how do you build your website or integrate these 3 components into your existing website? Stay with me as we’re about to look into that now!
Before that, let me do a quick run-down on the cost of designing an e-commerce website in Nigeria. Your cost of website design in Nigeria should include the following:
- Domain name (Around $15/year)
- Web Hosting (Around $50/year for starters)
- SSL Certificate (Around $80/year)
- Premium Website theme ( Around $60/year)
- Total cost is around = $205/year for starters
I assume you’re starting small, but if you’re planning to start big like top online stores in Nigeria then prepare to spend more.
But, you know what?
I can show you how you can get almost everything for free. You just need to pay for web hosting and you’ll get the rest for free.
I don’t know about you but I like free things.
As promised, your easy step-by-step guide on how to build an e-commerce website in Nigeria:
- Choose your E-Commerce Platform
- Get a Domain Name & a Web hosting account
- Install WordPress and WooCommerce
- Customize your E-Commerce Website Theme
- Add Your First Products
- Add Further Few Plugins & Extension
There you have it! So, let’s get started.
Step One: Choose Your E-commerce Platform
Before you build your website it’s very important to decide the kind of platform you want your e-commerce website to be built upon. It doesn’t matter the kind of website you want to build, it all depends on the platform you’re using.
Even if you want to create a website like Jumia or Konga, You can, once you’ve decided on your website platform.
There are various e-commerce platforms like:
- WordPress+WooCommerce
- Shopify
- Magneto
- BigCommerce
- Yo!Kart etc…
However, the most popular among them is WordPress+WooCommerce and Shopify.
Shopify is a fully hosted platform with a price starting from $29/month.
Shopify makes it’s super easy for those individuals that want to create their e-commerce website but having little or no experience at all.
This could be traced to the reason why Shopify is such a popular platform. All you need to do is create an account and the Shopify wizard will put you through the entire process.
Besides the easy setup, quick loading speed, and safe payment gateways. This platform also provides you with hundreds of templates to customize your e-commerce website or online store with the custom look you desire.
However, do have in mind that as your business grows your Shopify plans might also increase.
You can go through this review to learn more about Shopify in Nigeria.
WordPress+WooCommerce which is the most popular of all is what we’re going to be using as an example to build our e-commerce website or to learn how to create an online store in Nigeria.
It fit all specifications.
You can easily use it to create a regular website or use it to start an online store in Nigeria or even a small business website.
WooCommerce is very user-friendly and over 40% of all e-commerce website is powered by WooCommerce making it the best choice for creating an e-commerce website in Nigeria.
In case I forgot to mention, WordPress and WooCommerce are totally free to use. So you don’t have to border about the monthly fee.
It’s 100% free to use. Now, we’re going to be building our e-commerce website for the rest of the tutorial with WordPress+WooCommerce.
Step Two: Get a Domain Name & a Web hosting
First thing first, for any kind of website you need a domain name for your site and you likewise need to host the website too.
Domain name is the name of your website.
This is the name people will type on the search engine that will direct them to your e-commerce website. For example www.Jumia.ng.
Think of it as an address to your website. Without a domain name, there’s no way people can reach your business. So, it’s very important.
Also, while choosing your domain name you’ll need to determine if it’s going to be “dot com, dot net or dot ng” that is “www.yourecommercesite.net” etc.
This all depends on what you want for your business. But the most common one is “dot com”.
While web hosting, on the other hand, is the actual house of your website online. Domain name is just an address, web hosting is the actual house of the business.
This is where everything about your business is kept online for easier accessibility.
Everything that has to do with your business, data, content, gallery etc. are all saved on your web hosting account.
Since your website is for e-commerce you need a fast and reliable web hosting account that can load your website as fast as possible.
Because this is one of the most crucial points of setting up an e-commerce website.
Finally, you also need to secure your e-commerce website with SSL (Secure Socket Layer) certificate.
The SSL certificate is the standard security technology that establishes an encrypted link between a web server and a browser.
This encrypted link ensures that all data passed between the web server and browsers remain private and integral.
Too much grammar right? Seriously, don’t mind me.
Let me break it down to what you understand.
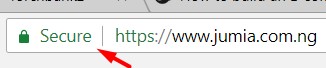
The SSL certificate when installed on your website helps by keeping sensitive data collected on your website safe and at the same time prevents hackers from having access to credit card information used on your website.
A good example is ATM cards, VISA or MasterCard used by your customers to buy products.
Having the SSL certificate installed will increase customer confidence in your website by the image displayed on their browser.
The image below is a perfect example.
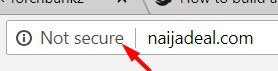
Without the SSL certificate, virtually every visitor that visit your website is going to run back. Because the image below is a good example of what they will see which is very bad for business.
So, how can you get your domain name and your web hosting account plus your SSL certificate?
Remember I told you, you only need to pay for web hosting and you’ll get the rest for free. To get all that, I’ll recommend BlueHost!
Why Bluehost?
Well, Bluehost is a large reputable and reliable hosting company when it comes to building a website.
Plus they’ve been in business for a very long time and they currently host over 2 million websites and 850,000 blogs across the whole world.
Their server is crazily fast and they save money. In short, below are the reason why you should consider BlueHost while building your e-commerce website in Nigeria:
- 30 days money back guarantee
- Free Domain name
- Great customer support 24/7
- Free SSL certificate
- 99.9% Uptime Guarantee
- Established hosting company
- Officially recommended by WordPress.org
- Pre-installed WordPress & WooCommerce
The best part is if you have any issue you can call them or chat them up and they’ll have everything fixed for you.
So, you don’t have to worry about knowing coding or HTML.
Now, let’s get your e-commerce business in Nigeria a website. What you need to do now is head over to Bluehost.com.
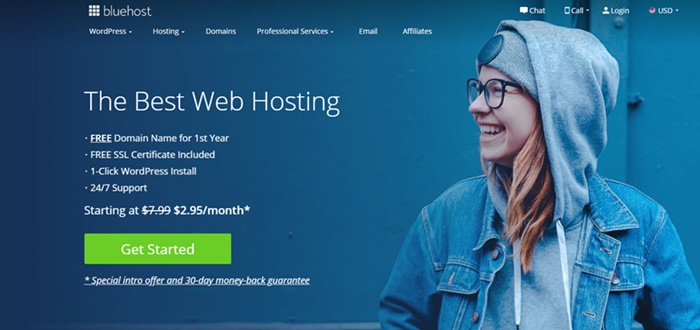
Once at the homepage, click the “get started” button to continue.
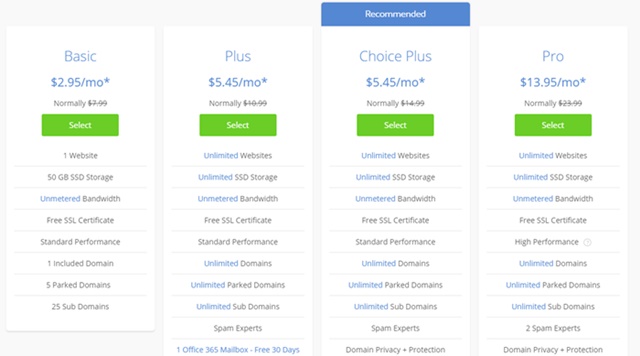
After that, you’ll need to choose a hosting plan.
You can start with the basic plan since it’s a new website. You can always increase it in the nearest future as your business grows.
The next is to choose your domain name. Getting a domain name with Bluehost is always free.
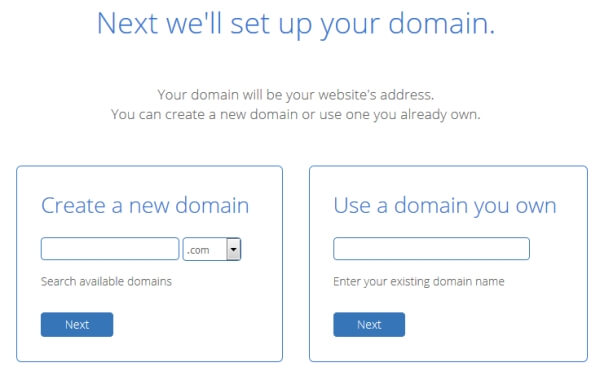
The small box with the “drop-down menu” will allow you to choose either “dot com” or “dot net” etc. and if peradventure you have a domain name already just choose the second box on the right-hand side.
Also, if your domain name is from another provider you’ll need to point the Nameservers to Bluehost.
If you don’t know how to do this you could chat up the support and they’ll put you through or simply get a new domain name since it’s free.
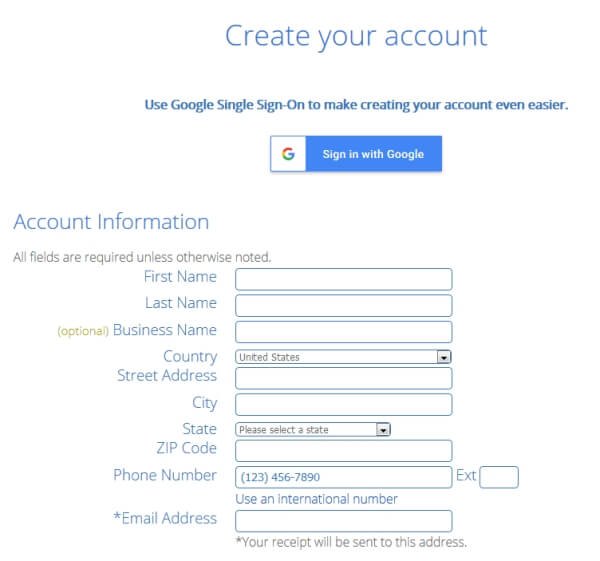
Once that is sorted out, you’ll need to create an account with BlueHost. You can easily do that by filling out the form as appeared in the image below.
After this is the package information. From the account plan, you can always choose your plan based on your budget.
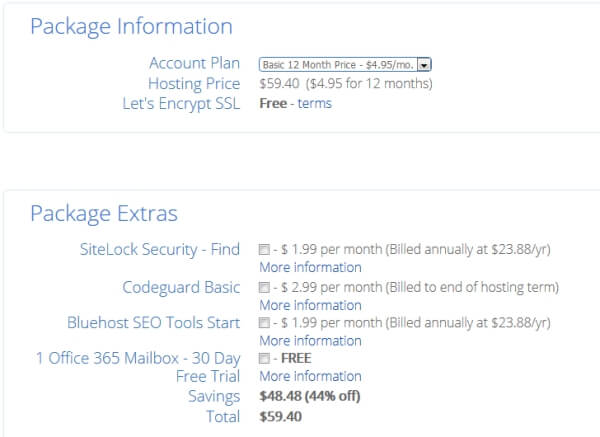
You can choose from 12, 36, or 60-month straight subscription. The higher the months the lower it becomes. However, this all depends on the size of your budget.
You don’t need to check the additional boxes except for the “Domain Privacy Protection’. The rest is just unnecessary additional costs.
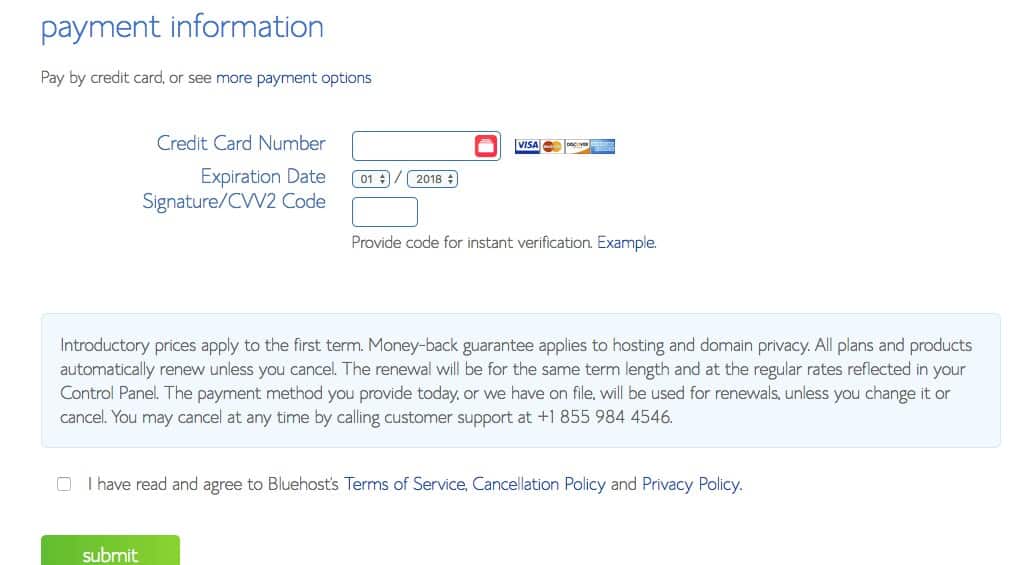
Finally, enter your payment information to secure your package. After that, scroll down and tick the terms of service to agree, then click the submit button.
That’s it, you’ve just gotten your domain name and a web hosting account for your website.
If your domain name was gotten from BlueHost, you should receive a notification from them asking you to verify your domain, if not, the domain name might get cancelled.
Step Three: Install WordPress and WooCommerce Plugin
Now, building your e-commerce website is just getting more interesting.
Gone are the days where you have to write scripts and code from the beginning to build a website.
These days, with the advent of WordPress, you can easily build your website even though you know nothing about web development.
You just have to find a template and run with it.
What you need to do now is install WordPress, then after that, install the WooCommerce plugin to build your e-commerce website.
The good thing about Bluehost is that after the checkout page the WordPress is automatically installed for you!
You don’t have to worry about having experience with WordPress development or not.
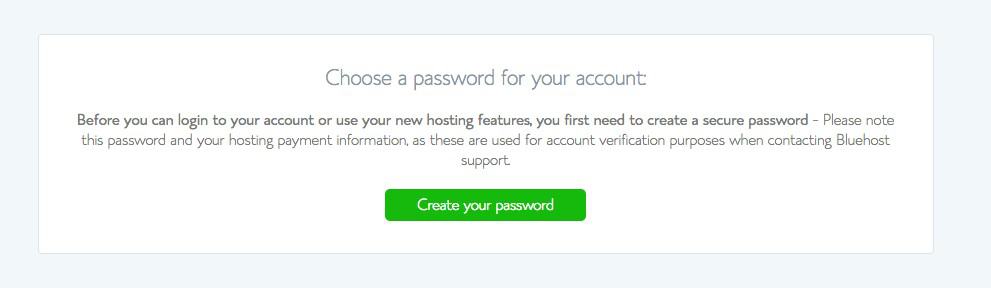
After the checkout page, BlueHost must have notified you to create a password for your account.
Once you’ve successfully done that you can then log in with your account details.
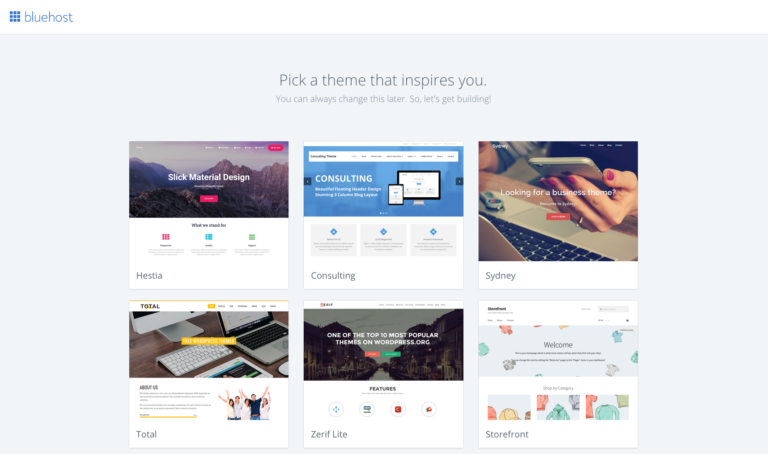
Immediately you log in, BlueHost is going show you some free WordPress theme to choose from.
You don’t need them so there’s no point in choosing one, you can skip that by clicking the button under the page.
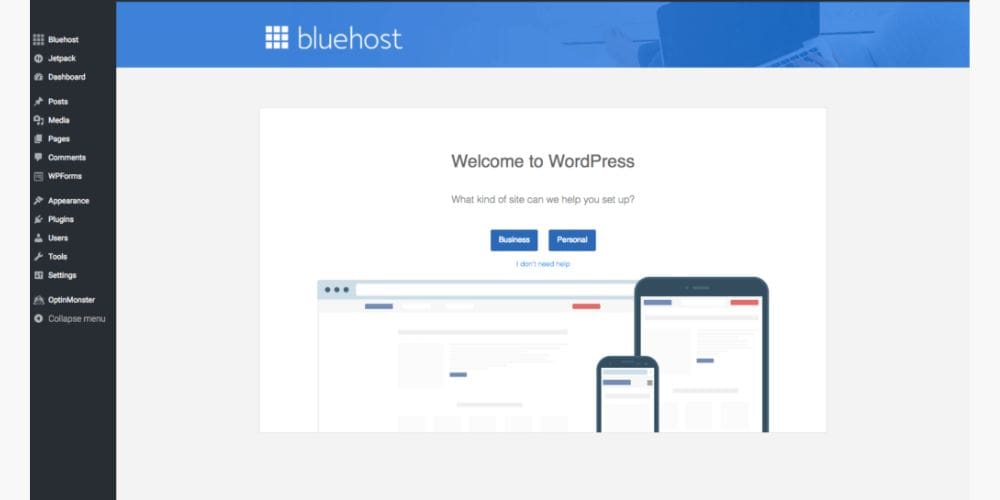
On the next page, you going to see a “Welcome to WordPress” with a question under asking if you need any help. Click I don’t need.
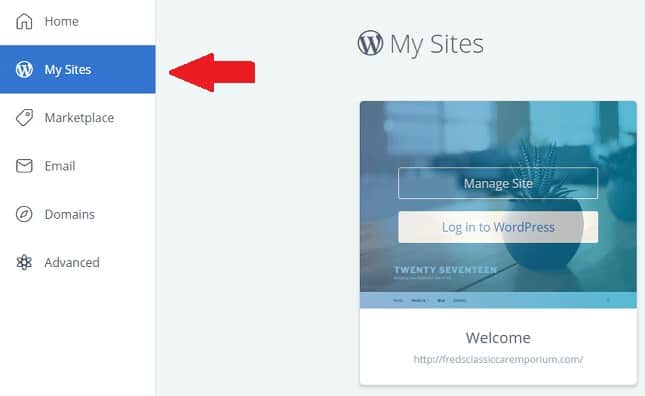
Next, log in through your cPanel, BlueHost must have sent you your account details to your registered email address or there should be another tab opened for your cPanel already on your browser.
Once you’ve login, click my “my site” on the left-hand side to set up your WordPress account.
It’s a few simple set up procedure. Once you’ve done that you now have a fully functional WordPress site.
WooCommerce Installation
The next procedure is now to install the WooCommerce plugin which will enable you to build an e-commerce website.
To do this, login into your WordPress admin dashboard. You can do this by going to your “ .com/Wp-admin”. Or login directly from your Bluehost account.
Once you’ve logged in, at the left-hand side go to plugins then click on add new.
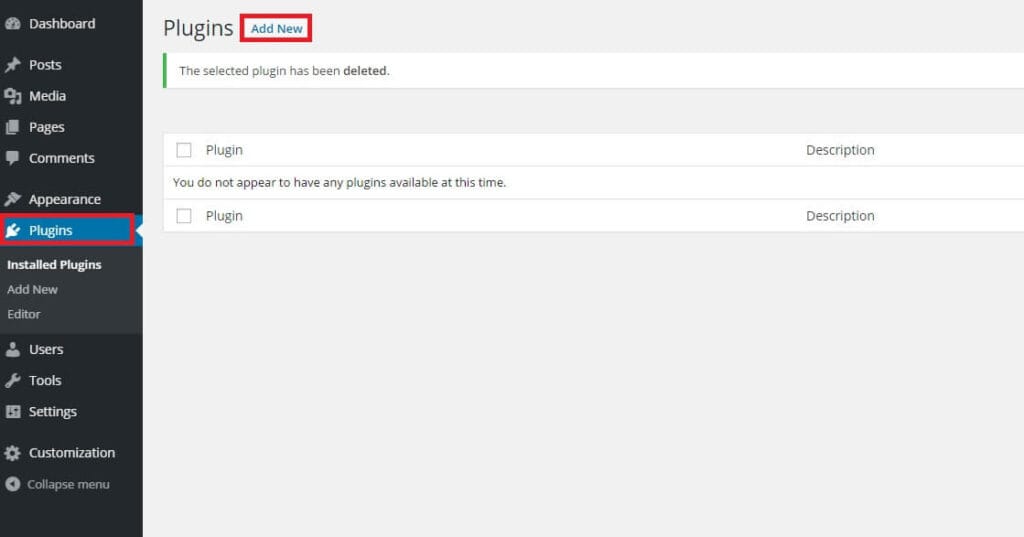
After clicking the “Add New” button. Enter “WooCommerce” in the keyword tab.
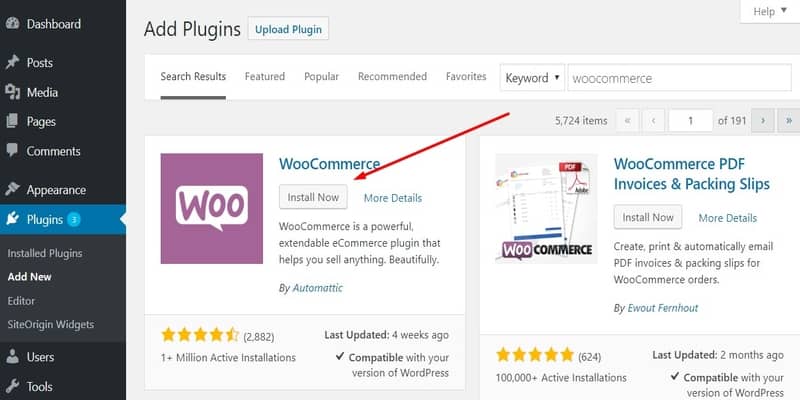
Click the “Install Now” button to install the plugin once install click the activate.
After this, you’ll see the WooCommerce on-screen set to set up your e-commerce website. All you need to do is just follow it a step at a time.
This page, being the first page will ask for your location, choose the country of your choice and your country currency.

Additionally, if you scroll down, you’ll need to choose the kind of products you want to sell and if you’ll be selling in person.
You might need to tick the “I will also be selling products or services in person” since you might be running a payment-on-delivery service.
The next page is the payment option.
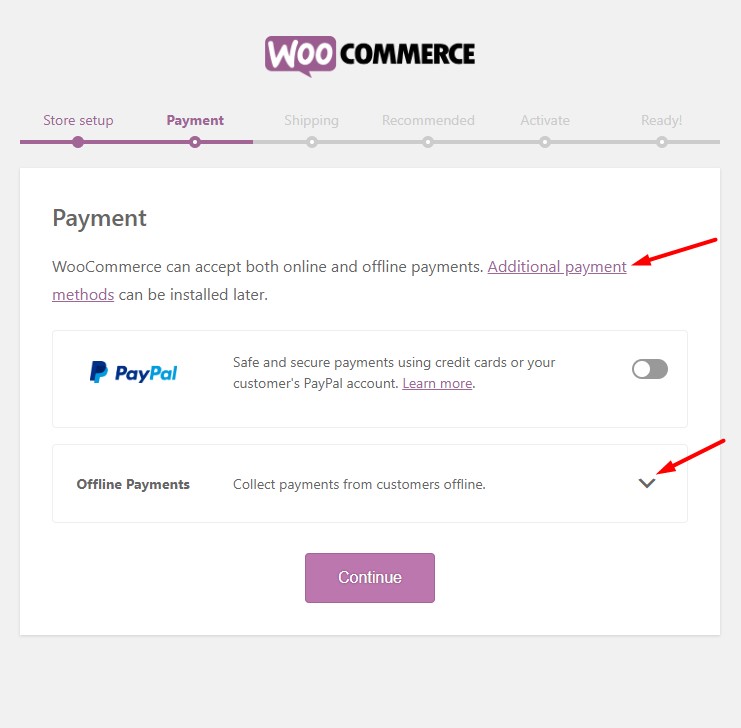
You don’t have to worry if your payment gateway is not there, you could always add and install them later.
The offline payment method will allow you to receive payment via bank transfer, payment on delivery etc.
You could go through this list of e-commerce payment gateway in Nigeria to add your payment gateway later.
The next page is the shipping page.
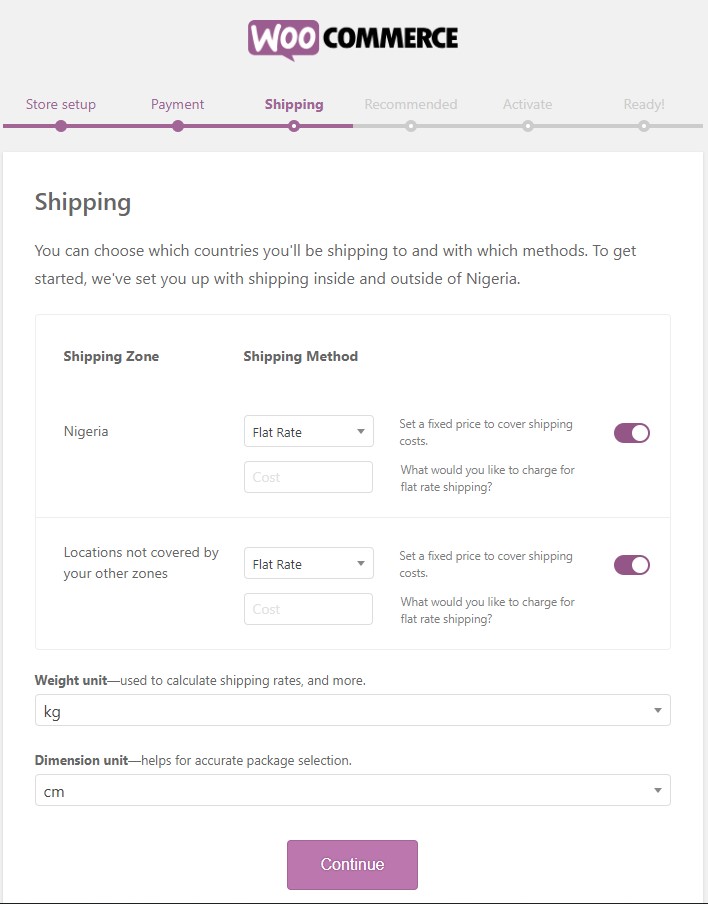
At this page, you can select the price you want to charge for the shipping of products.
You don’t necessarily have to do that now if you don’t know yet, you can always do that later.
The next page is the recommended tool for your e-commerce website you can skip if you don’t them.
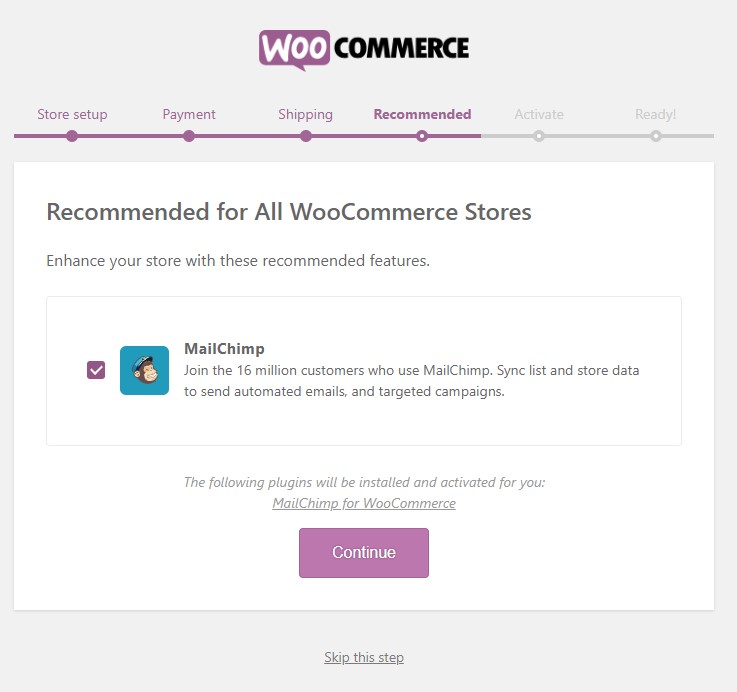
MailChimp for WooCommerce is an email marketing software that can be used to send newsletters to your subscribers or notify your customers of any promo you’re doing etc.
If you have other email marketing software in mind you could uncheck the MailChimp box and install the other one later.
The next page will ask you to connect your website with Jetpack plugin for your site enhancement.
Once you’ve done that your website is ready to start selling.
This is the last page you’ll see.
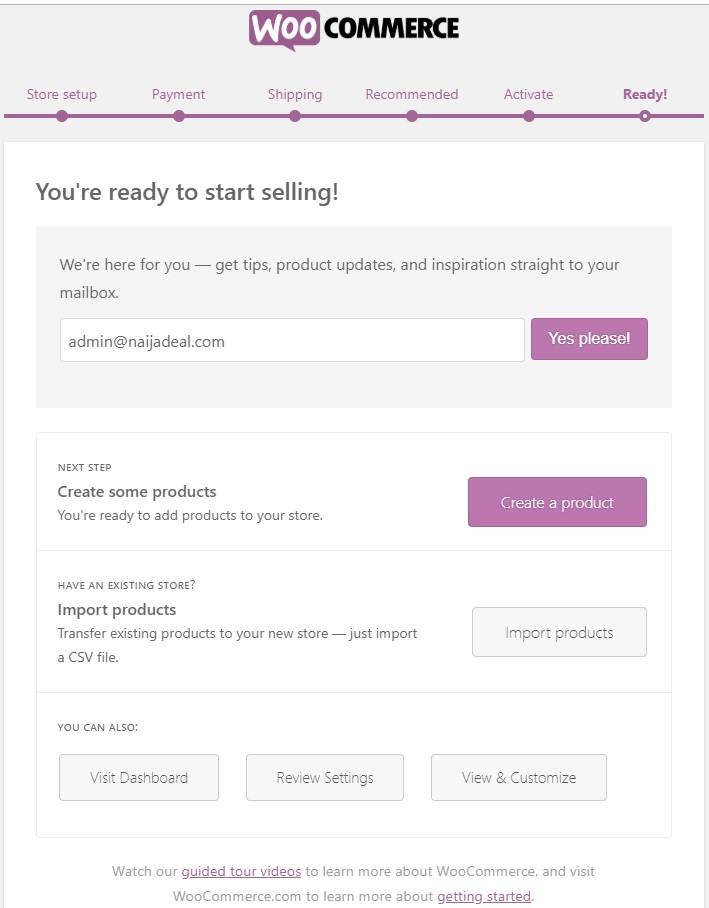
You can click the “create a product” button to upload your first product or simply return to your dashboard.
Step Four: Customize your E-Commerce Website Theme
The theme you used determines the looks of your WordPress site to your users and when it comes to WooCommerce it also determines how your products are being displayed.
Normally, the WooCommerce plugin must have installed its default theme on your website, Storefront.
To customize the theme, go to Appearance => Customize. This will allow you to see the front end of your website as you customize it from the inside.
With this, you can edit to your taste and if peradventure you didn’t like the theme you can visit ThemeForest.com to check out varieties of beautiful premium themes for your e-commerce website.
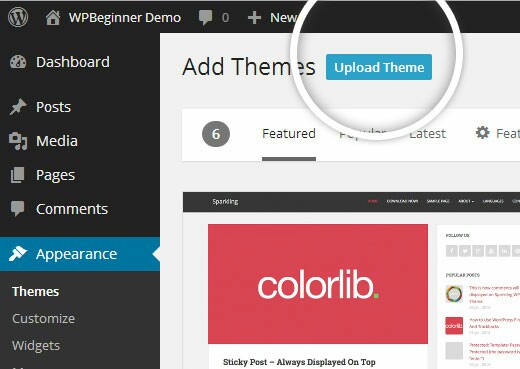
Once you’ve got a new theme, you going to need to upload it to your website.
To do this, head over to Appearance => Themes.
Next, click the “Add New => Upload Theme” to upload the theme file of your premium theme.
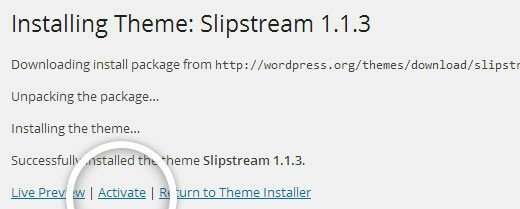
After this, you’ll need to choose the file from your desktop in other to upload it. Once it’s uploaded successfully, click “activate” to activate the plugin.
Step 5: Adding Your First Product
Once everything is in place, you’ll need to publish your first product to bring your website live.
To do this, go to Products => Add Product.
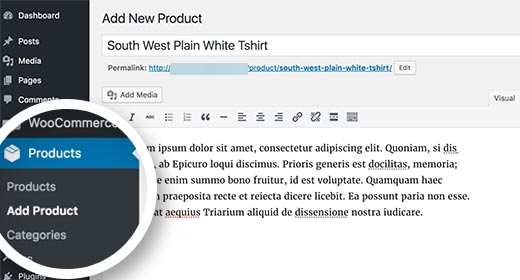
You’ll need to give the product a title and some detailed description.
On the right-hand column goes the product categories box.
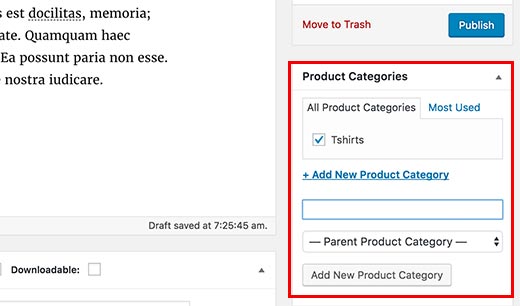
To add a new category for your product, click on “Add New Product Category” which is the last button inside the box.
If you scroll down the product page, you will see the product data box where you will provide further detailed information about the product.
Information like the price of the product, product inventory, shipping of products etc.
Below this product data is where you can add a description of the products. This description will be shown when users are viewing multiple products on your website.
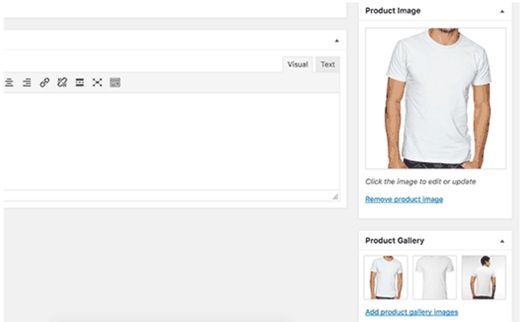
Finally, on the right-hand column, you’ll see boxes to add the main product image and as well as the product gallery.
Once you feel you’ve written everything you should about this product, click the blue “Publish“ button to make it live on your website. Just keep repeating the process to add as many products as possible.
Step Six: Add Few Further Plugins & Extension
While WooCommerce is such a better tool to build an e-commerce website or an online store in Nigeria owes to the fact that you can easily install free other plugins to supercharge your website.
below are further recommended plugin you can install on your website.
- Yoast SEO – This is a powerful plugin that any WordPress site owner should have. The plugin helps improve your Google search appearance.
- UpdraftPlus – Using this plugin gives you the ability to easily back up your site content. Every detailed information on your website should be constantly backed up.
- W3 Total Cache – This help to speed up your website and allows for better user experience through the speed of your website.
- Force Regenerate Thumbnail – The plugin helps to resize your product images and allow your website to load more faster.
Conclusion
At first, it may look like you can’t do it yourself but trust me it’s not always the case, so take it a step at a time and before you know it your website is up and running.
Here’s the summary of everything, first get a web hosting account and a free domain name with BlueHost, once your account is set up, WordPress must have been pre-installed, you just need to install the WooCommerce plugin to start adding products to your website.
If you like to have the pre-installed WordPress+WooCommerce to create your website with Bluehost, then follow the link… Bluehost/WordPress+WooCommerce. This way, you’ll only have to run the WooCommerce set-up because it’s already installed.
If you think this article is very insightful please share it with your friends on social media, having any questions?
Please don’t hesitate to use the comment box!
![How To Create Facebook Ads in Nigeria [Step By Step]](https://smartbizfreedom.com/wp-content/uploads/2022/08/Facebook-ads-in-Nigeria-768x432.jpeg)
![Shopify Review: How To Use Shopify In Thailand [Pros & Cons]](https://smartbizfreedom.com/wp-content/uploads/2023/09/Thailand.jpg)
![How To Use Shopify In Albania [The Complete Guide]](https://smartbizfreedom.com/wp-content/uploads/2023/09/Shopify-Albania.jpg)
![How To Use Shopify In Turkey [The Complete Guide]](https://smartbizfreedom.com/wp-content/uploads/2023/09/Turkey.jpg)
![How To Use Shopify In Trinidad and Tobago [Full Review]](https://smartbizfreedom.com/wp-content/uploads/2023/09/Trinidad-and-Tobago.jpg)
![How To Use Shopify In Pakistan [The Complete Guide]](https://smartbizfreedom.com/wp-content/uploads/2023/09/Pakistan.jpg)
Wow. God bless you for this sir. Your really make it so simple!