How to Start A Travel Blog In Nigeria [Step By Step Guide]
So, in today’s post, we’ll be discussing how to start a travel blog in Nigeria and be successful at it even if you have little to less experience before.
How would you feel making money passively and travelling around the world staying in an expensive hotel without spending your own money?
Cool right?
These are potentials attached to starting a travel blog in Nigeria or from any part of the world. You’ll get sponsors to invite you to write about them while travelling in luxury and style.
But before you start having butterflies in your stomach let me quickly tell you that it’s not all sunshine and rainbows.
Starting a successful travel blog in Nigeria requires work. You must be willing to publish contents and update your blog frequently.
Asides the works…
There is actually a lot of money to be made in this kind of business… and it’s a two-way thing!
I mean most people start for 2 reasons:
- People that travel a lot and want to write about their travel experience
- And people that want to write about travels and make money doing so…
Whichever of the two, the KEY factor is… it can be very LUCRATIVE and I’ll be showing you how to get started step by step!
How To Start A Travel Blog In Nigeria
Now that we have a basic understanding of how a travel blog works let’s talk about how you can get started in a few steps…
Step 1: Choose a Niche
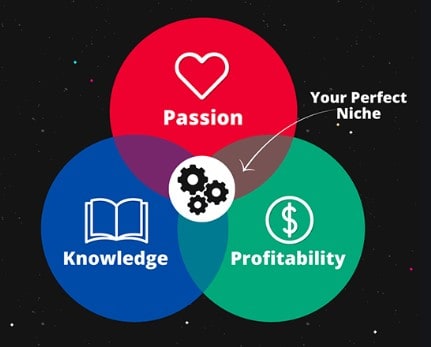
It’s best to start your travel blog by choosing a niche most especially when you’re keen to making money with the blog.
This will help differentiate you and stand you out from other numerous bloggers blogging about travels and stuffs.
There are several niches under travel blog that you can choose and start blogging about. To some, this might comes naturally.
While For others, it could take a while to make a decision. Here are some questions you can ask yourself when determining a niche for your travel blog:
- Why do I want to blog?
- What am I passionate about telling or teaching to others?
- What are my skills, strengths, interests, and expertise?
- Can I write about this topic for a long time?
Once you’ve been able to figure that out choosing your perfect niche will become easier. However, as time goes on you could expand the niche and create more content.
For more inspiration, below are some of travel blog niches you can begin to write about:
- Area/Region
- Family travel
- Travelling for work
- Solo travel
- City blogging: You can focus on your city for this, and you don’t have to travel before creating content on it since you’ll know it better than anyone
- Country-focused: Destinations around the country
- Budget travel
- Luxury travel
- Female travel
- Adventure travel
- Travelling with disabilities
- And many more…
To be sure that someone will want to read your blog, search for your competition to validate if there’s an existing audience for your idea.
Best way to this is to search for the topic you want to write about if you see content around it that means people are looking.
And you could also be the first to write content about the certain keywords you want to write about.
Step 2: Choose Your Blogging Platform
Now that we’ve established the need for choosing a niche, you need to choose the platform at which your blog will be established.
There are several platforms online to choose from but WordPress is still the best because it’s user friendly and easy to understand.
The other platforms come with their own restrictions, but with a self-hosted blog like WordPress site, you’re free to customize it completely.
Self-hosted WordPress also allows you to grow and not worry about having to change platforms later if your travel blog suddenly becomes super popular.
WordPress powers 35.2% of the internet, is super user-friendly and has flexible customization options. It is used on many different kinds of websites, be they blogs, eCommerce sites, news portals, or business sites.
Due to its open-source nature, WordPress is free to use, however creating and maintaining a site might cost you some money.
You’ll have to pay for your professional domain name and web hosting which is usually once a year compare to other platforms that require a monthly fee.
Why Start with WordPress
- It’s totally free plus you also get free themes & plugins.
- Easy to setup
- It has a support forum
- WordPress is always updating their software
- Highly customizable.
Step 3: Register Your Domain Name and Web Hosting Account
This is where you get to create a brand name for your travel blog and at the same time register and host it so it becomes your legally.
Registering your domain name and setting up your web hosting account could be a little technical if this is your first time.
However, you have nothing to worry about as we’ve made the whole process easy to follow with picture descriptions.
Now, before we get started, you’ll need to come up with a name you want to name your blog… and I’ll assume you have that already!
Just come up with any name that makes sense to pronounce. It can be the combination of your first and last name, name + your topic, etc.
Just don’t overthink it… let it come naturally!
Purchasing Your Domain Name
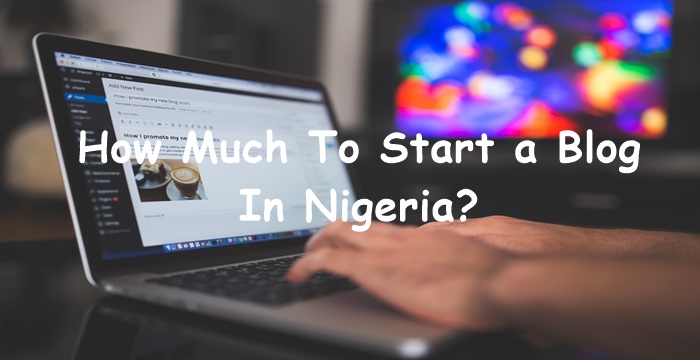
Now that you’ve found a name, it’s time to pay for it. Normally it would cost about $10-$12 to buy a domain name for a year.
But before we proceed – I want to bring it to your notice that you can SAVE your 10 bucks by getting a domain name for free. I’m not joking here!
You’ll get a free domain by using this link and only pay for your hosting service. Sounds sweet right?
The aspect where most of the money is spent is on hosting service. But the good news here is that the hosting service which you shall be using – would give you a free domain name.
Therefore, cutting more costs for you!
Never let the cost of starting a blog in Nigeria be the problem, because you’ll make times 100 of that within months if you know what you’re doing.
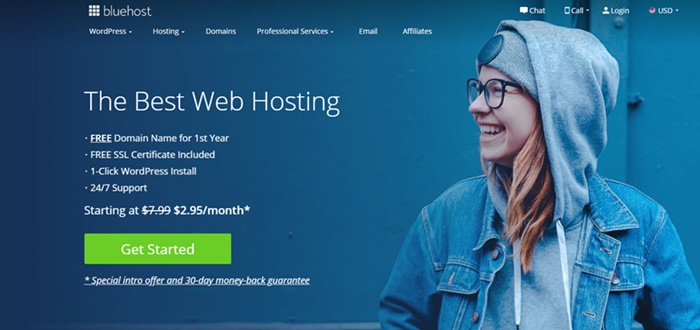
Bluehost hosting service is what we shall be using to host our WordPress site and I highly recommend them for all new bloggers because:
- They give you a domain name for free, thereby saving you cost
- Offer one-click WordPress installation, unlike other hosting companies
- They’re the only recommended hosting solution by WordPress
- 24/7 customer service
- There’s a money-back guarantee for all (nothing to lose)
> Click here to get Bluehost as your hosting platform! <
After clicking the above link – you shall be brought to the below screen. Click “get started now”
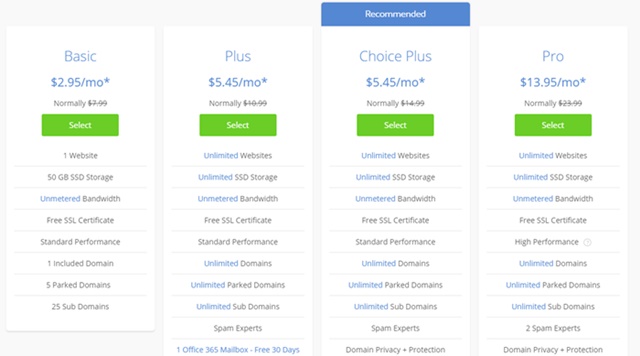
Select your plan. Here I recommend you get the basic plan. Then click “Select” to choose your plan.
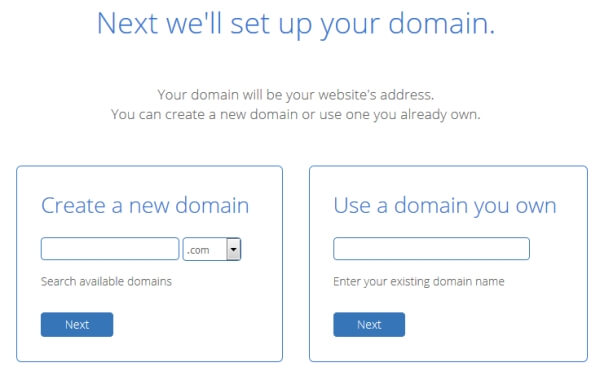
Next is where you’re to type in your new domain name (this is free). If you’ve already bought your domain from a registrar – then type your existing domain in the right box and then click “next”.
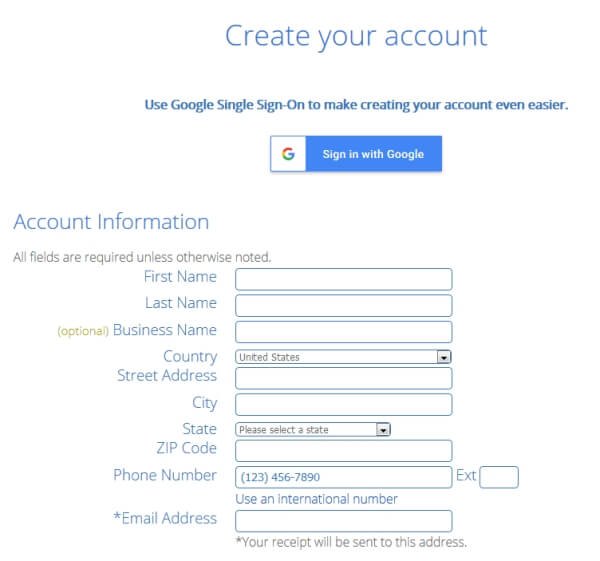
Fill out your billing details on the registration page.
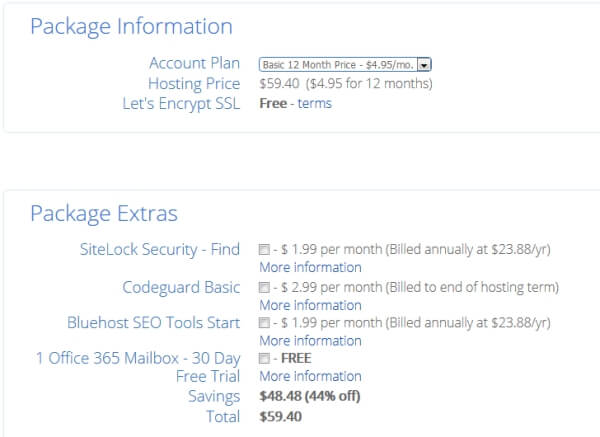
Choose your hosting package and options:
- All the options have everything you need to get your blog up and running, including the free domain, fast WordPress installation, web hosting and many more.
- The 36 months packages get you the lowest monthly rate, while the 12-month package has a lower up-front cost.
- Make sure you uncheck the boxes next to other products during your signup. You don’t need them for now.
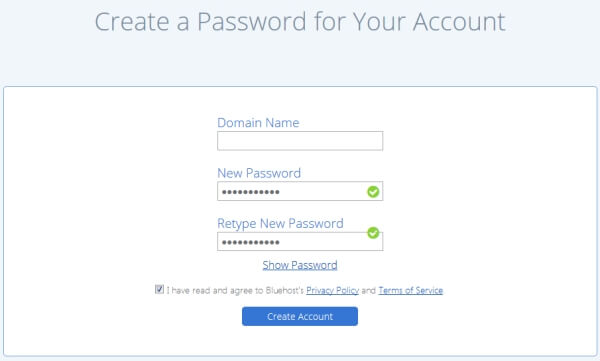
Next is creating a password for your account. After that, you can choose a basic design template for your blog (you can always change this later).
Now, your blog software (WordPress) will be installed. Once install is complete click “Start Building” to get logged into your blog.

You will receive an email with your blog log-in details.
Step 4: Customize Your WordPress Travel Blog
Before you start customizing your blog – you’ll need to login to your blog to access the dashboard via the admin URL using the details sent to you by Bluehost.
Or simply head over to http://yourdomainname.com/wp-admin and you’ll see this screen
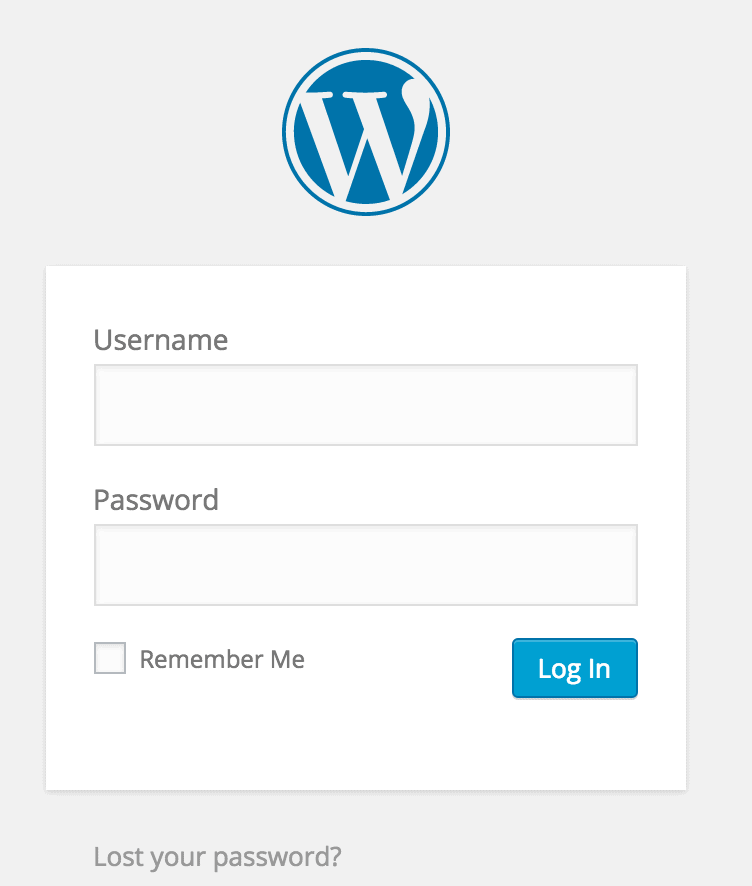
What you need to do now is type in your username and password and you’ll be logged in!
Once you’ve logged in you’ll see your WordPress admin dashboard and that’s where you’ll be running your travel blog.
Everything you need is located at the left-hand side of the admin dashboard area.
Posts (for writing articles for your readers)
Pages (for pages on your site, like an About me or Contact page — these will be shown on the navigation bar at the top of your site at all times and will be easily accessible to your readers)
Comments (where you’ll approve, spam, or reply to comments on your articles from readers)
Appearance (where you’ll alter the look of your site by installing a new theme, editing its code, and adding sections to your sidebar)
Plugins (for adding additional features to your site)
Settings (where you can alter your site settings).
It might all sound a little overwhelming right now… but you just need 2 to 3 days of playing around the dashboard and you’ll get used to it.
Choosing a theme
Your blog will come with a default theme – but I do not advise you to settle with that. Most people want to choose their own theme to make their own.
The thing is…
WordPress is so popular that there are thousands of free and premium themes to select from.
If you’re on a budget starting out with free themes like:
- Astra
- OceanWp
- GeneratePress
Or rather go with a paid theme option. The best-paid WordPress themes I recommend so much ElegantThemes and ThemeForest.
Both are popular providers of premium themes – containing thousands of amazing themes.
Difference between free and paid WordPress themes
While some people will try to scare you into paying for a premium theme – there’s nothing that really makes a premium theme a better one.
Just that paid themes often have better support and features, although that’s not universal.
How to install your new theme
Go to Appearance >> Themes and click Add New
Then you’ll be taken to screen similar to this:

- For free themes – search for the theme by name and click Install
- Then for premium themes (which you might have downloaded) – click Upload Theme and upload the ZIP file of your theme.
Once the theme has been installed, make sure to click the Activate button to make it live on your website.
Customizing of your theme
This is an aspect where you customize your WordPress theme to your taste.
To do this go to Appearance >> Customize. You’ll be brought to the customization where you can play around and go a bit creative in changing and customizing things like:
- Site Tag line
- Your favicon
- Your site menu
- Typography
- Header and sidebar
- And lots more…
Step 5: Installing The Necessary Plugins for Travel Blogs
Before we list the necessary plugins for our WordPress travel blog lets talk on how to install it first… be it paid or free plugin.
Once you know the plugin you want to upload:
- Go to Plugins >> Add New from your WordPress dashboard
- Search for the plugin name and Install
- If it’s a paid plugin, click Upload Plugin and upload the ZIP file.
- Then activate after it’s installed
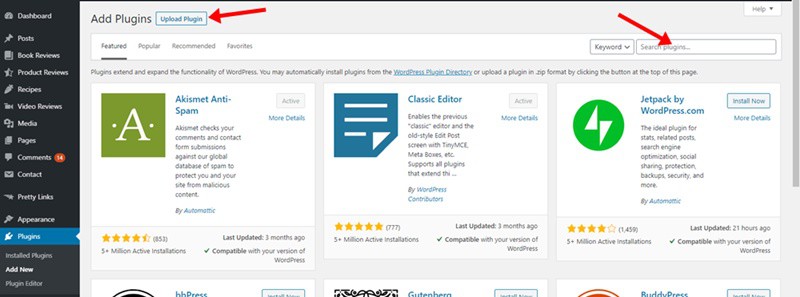
Essential Plugins For Travel Blog
These plugins will help improve the overall functionality of your site and give you access to tons of new features.
To get started, head over to the Plugins section of your site and click on “add new”. You’ll then be able to search for the following plugins:
- Akismet – Protects your blog from spammers leaving comments on your posts. Not perfect, but probably the best one out there.
- Yoast SEO– Very important plugin for optimizing your articles for Google search, plus integrating Google Sitemaps and Analytics.
- Updraft – For backing up your WordPress content
- Contact Form 7 – Lets your Audience easily contact you
- Mash Share – Nice social media sharing buttons for your articles.
- Monster Insight – For monitoring your Google analytic
- Wp Rocket – Caching plugin that speeds up your travel blog
- Imagify – Automatically optimizes your media library images for fast loading
There are actually more of course, but these will get you started.
Step 6: Create Your Blog Pages & Your First Post
One of the first things you should do on your blog is to create your essential pages like:
- About Us – This is one of the most highly trafficked pages on any travel blog, because it tells people who you are, your background, and explains why they should follow you
- Contact Us – A page where which contains a contact form, visitor can contact you through
- Privacy Policy – Another essential page that details how a website gathers, stores, shares, and sells data about its visitors
- Terms & Condition – This is an agreement page on a website that sets out the rights and responsibilities of anyone using the site. It effectively forms a contract between the site and the user
Also, If you want to build a successful and profitable travel blog, posting regularly to social media is important. So you need to set-up all your social media pages up and running.
To make it happen, sign up for all the most popular social media platforms, and keep your social media username the same on all of them if possible. This is to make it easy to recognise you and avoid getting people confused.
- YouTube
Creating Your First Post
Now it’s time to begin writing content for your travel blog in Nigeria. At first, I recommend publishing new articles of at least 1-2 times per week.
You can increase as time goes by… and also remember that quality is better than quantity.
Take your time to write quality and useful blog posts that have an impact. You’d want your articles to inspire.
Share your favourite (or not so favourite) parts of a country.
Try and give tips for fun things to do, share your crazy travel stories, show-off your beautiful images in photo essays, create a short video tour, or give food recommendations.
There are tons of content ideas you can write about.
For example, road trip guides.
To start writing, head over to Posts >> Add New
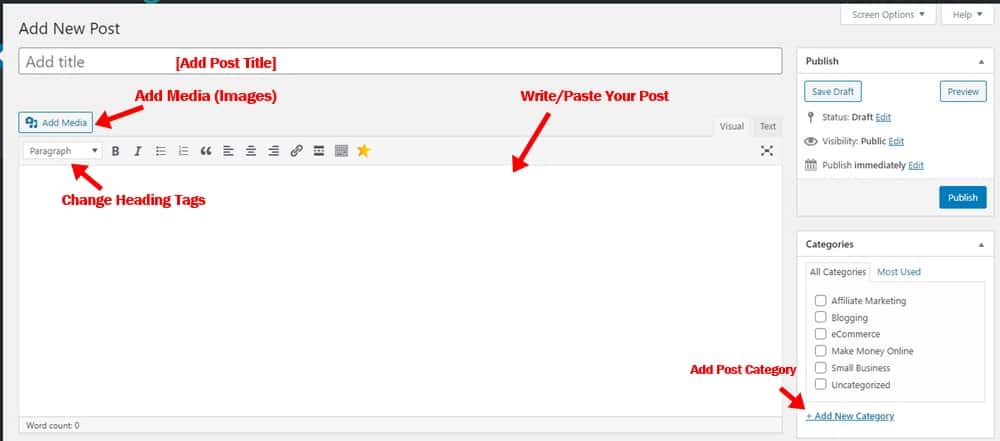
- Enter your blog post title at the top
- Paste or enter your blog post text in the editor box. You can format your post the way you want.
- You can add images to your post using the Add Media button to upload
- Choose a category or add a new one on the right
- Then click Publish when done
Step 7: Making Money With Travel Blog In Nigeria
The more traffic your travel blog receives, the more money you can make with it. It takes time to build an audience and grow traffic. Don’t focus on making money right away; focus on building your audience.
However, you can start earning income early with Affiliate Programs like Amazon.com, Airbnb.com etc.
Basically, affiliate marketing let you recommend things like clothing, travel gear, photography equipment, tours, or even hotels you stay at within your blog posts.
You then earn a small commission whenever someone clicks on one of these tracking links and buys something.
Another option is showing display ads with Google Adsense, which lets other companies post banner advertisements on your travel blog.
Ready to create your Blog
![How Much Do Bloggers Make In Nigeria? [Updated For 2025]](https://smartbizfreedom.com/wp-content/uploads/2020/03/Nigeria.jpg)
![How To Become A Successful Blogger In Nigeria [10 Working Secrets]](https://smartbizfreedom.com/wp-content/uploads/2020/03/Nigeria-1.jpg)