
How To Open A Selar Account [Step-By-Step Guide]
Today’s article will discuss how to open a Selar account from scratch until the end.
We will hold you by the hand to enter your email, set up your bank details, and even add your first product on Selar.
We will also share with you strategies working right now on making outstanding sales with Selar.
If this sounds like what you want to learn, you need to keep reading.
Selar is a great platform to begin selling all your digital products online because of its simplicity.
One of the advantages is that you don’t have to pay a dime, to begin with, with no domain and no hosting whatsoever.
Sounds good, right? Yes, it’s!
So, join me as I take you on how to open a Selar account.
Let’s jump right in!
Contents
- How to Open a Selar Account
- How do You Make Sales on Selar?
- What Percentage does Selar Take?
- Final thoughts
How to Open a Selar Account
Let us take a run-through of creating a Selar account, starting from scratch to the end.
The first thing you need to do is to go to selar.co, and you will be redirected to the homepage.
All you need to do is click “Start Selling,” as the arrow points below.
We divided the signup process by headings to make it easier to follow.
1. Enter your details
Taking it from where we stopped when you clicked on “Start Selling,” you will be redirected to the page below.
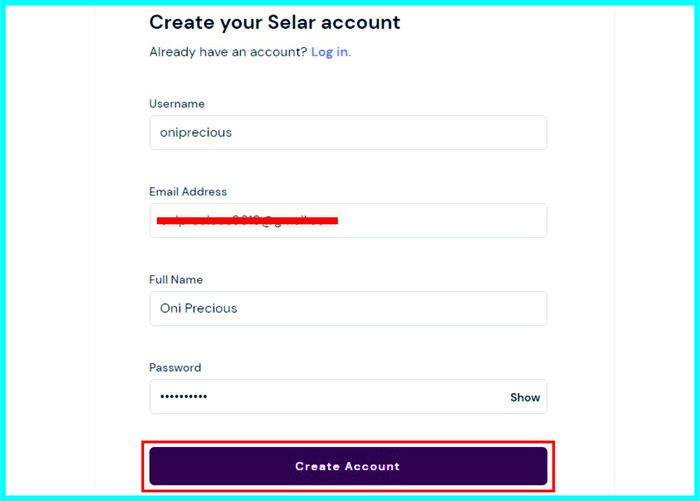
Here, you must fill in your primary information, including username, email, full name, and password.
After everything has been filled in correctly, like the way above, click on “Create Account.”
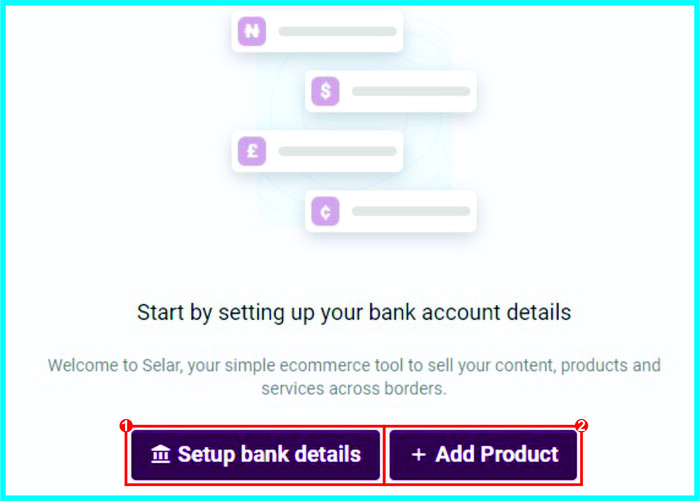
Next, you have the dashboard where you will be asked to set up your bank account and add your first product.
2. Set up Bank Details
The first thing you need to do is to set up your bank account details.
To begin, after successful registration, on the dashboard, you will have two options which are:
- Setup bank details
- Add product
Firstly, click on the setup bank details just like shown below.
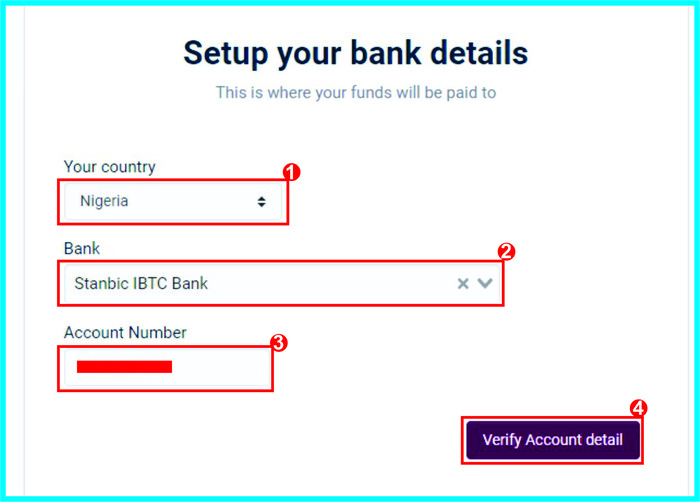
You need to confirm the country your account is opened from, the name of the bank, and the account number.
You only need to fill in the details the way it’s below and click on “Verify Account details” after that.
Upon clicking on “Verify Account details,” Selar will automatically generate your account name, as shown below.’
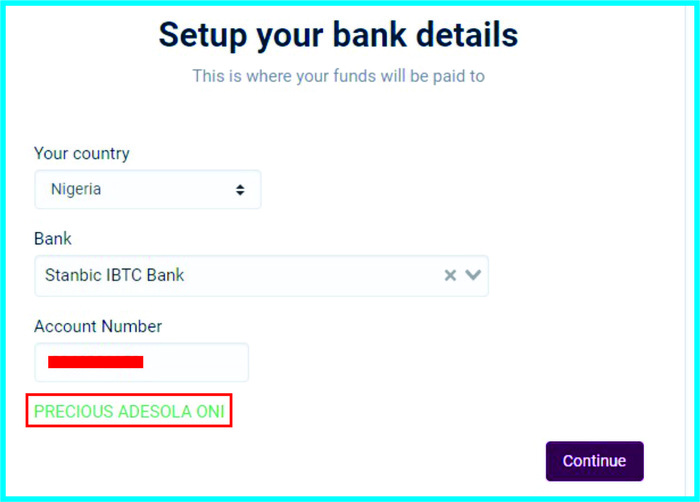
On the other hand, you need to confirm if the name is correct; if it’s accurate, click on continue.
A prompt will pop up asking you if your account details are correct; click ok since it’s correct.
After clicking ok to confirm the account details, you will be redirected back to the dashboard, where you can add a product.
3. Add Product
Taking it from where we stopped above, you now have the page below.
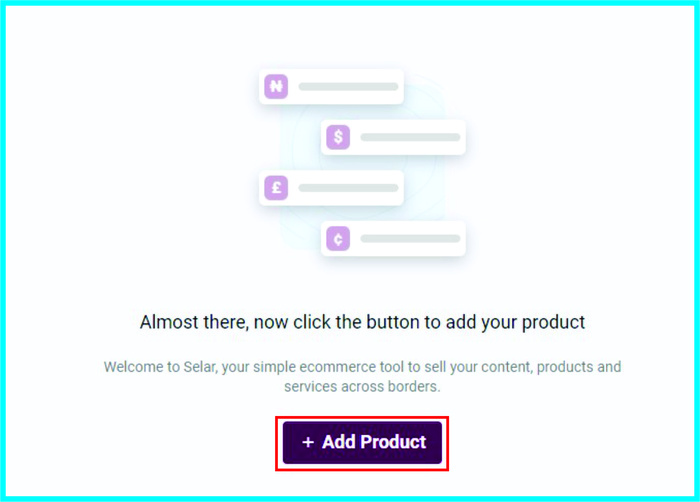
All you need to do is to click on “Add Product,” and the next page will show you the product categories.
Which usually looks like the one below.
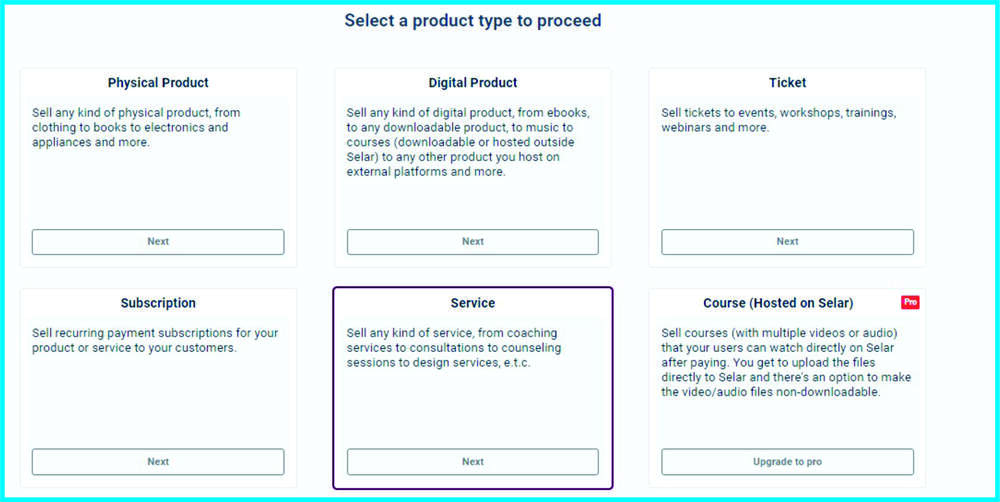
On the other hand, you need to choose one; for the sake of this tutorial, we will focus on “Digital Products.”
So, when I clicked on “Digital Product,” it directed me to the next page where I needed to fill in my product details.

You will also have the opportunity to set price slash, drag or upload a product image, make the product downloadable or read-only, etc.
They’re very easy-to-follow instructions, you need to follow them, and you will be done in no time.
Note: They’re premium categories in those categories, although it’s used for higher packages like online communities.
Repeat the same process to add more digital or physical products.
How do You Make Sales on Selar?
Here, we will go through some proven strategies that have worked over the years.
If you really want to make sales on Selar, then you need to follow one or two tips I will share here.
1. Social Media Ads
Social media ads remain the best and easiest way to start generating sales as soon as possible.
Even though you are a complete beginner, social media ads would work powerfully from scratch.
However, your results would be poor if you don’t have any knowledge upfront.
So, I recommend you take even though a course first before you begin; you can get a course on Udemy.
Some courses are free, and some are paid, but I recommend you take the paid one to supercharge your knowledge. The paid courses are very affordable.
2. Influencer Marketing
Influencer marketing is another way to skyrocket your sales on Selar.
All that the influencer requires is to recommend your digital or physical products on their social media platforms.
To get influencers to promote your product on Selar, you need to do is to first research influencers by typing keywords that are related to your product on Instagram, Twitter, or Facebook search.
Comb through the search results, and look for the ones with a good number of followers.
Secondly, look at the influencer’s previous posts and ensure that people are engaging well on the posts.
Lastly, DM the influencer and negotiate the price. Make sure you bargain well because if you don’t, you will lose.
3. Email Marketing
Over the years, email marketing has always remained the best marketing strategy any business can adopt and do well with.
That is because when you build email lists, you own those lists forever, and with time, a more significant percentage can become loyal customers.
All you need to do is to build an excellent relationship with your lists, nurture them, and give them free knowledge.
By doing so, you will soon become the “go-to person” in their minds whenever they want to make a purchase online.
So, how do you build an email list?
All you need to do is to sign up with Getresponse. It is one of the best email marketing service providers.
After signing up, create a lead magnet that is the main or part of the course you want to sell.
A lead magnet is a PDF file or video content designed to be given out for free in exchange for email and with the intention of selling your products later.
After that has been sorted, run lead gen ads on Facebook to build up your email list.
4. Blogging
Blogging is another way that can help you build an email list, build a loyal community and even help you become an influencer in your chosen niche.
Yes, blogging is superb. The drawback here is that:
- It takes time
- It requires a huge learning curve
- It requires little upfront capital.
But the truth is that if you are willing to put in the effort and try everything possible to build it up, it would be worth it in the long run.
Blogging also has the potential to help you widen your knowledge in your chosen niche.
If you are willing to start a blog, read how to start a blog by Olusola David.
You can also bypass all the learning curves and start doing well quickly by grabbing his course here.
What Percentage does Selar Take?
Selar only charges you for every successful transaction, which differs by the currency you are being paid of.
For example, you are charged 4% + N50 for naira, 10% and 10 cents for USD, and 10% + 50 Pence (Great Britain). For other countries, check out Selar’s pricing guide.
In addition, you are charged 5% for every successful ghana transaction and other neighbouring countries.
If we look at it, the percentages are fantastic when we consider all the benefits we get from Selar.
Selar competitors charge more, which is annoying because most of them can’t help you process payments internationally.
That alone is a huge added advantage to Selar.
Bonus: You can withdraw all funds in your Selar wallet straight to your bank account and get it in minutes.
Final thoughts
Selar is an excellent platform to host all your digital products and fits in for beginners and pros.
One of the reasons why I like it is that adding your first product to the platform is not stressful at all. Even your ten years old can do it.
It gets more enjoyable when you know that you aren’t paying a dime to get started. It is a fantastic place to begin as a beginner, just starting online with little to no budget.
Remember, to make money through Selar, you need to advertise on social media through paid means or organically, engage influencers, start a YouTube channel or even start a blog.
I’ve tasted immense success through affiliate marketing blogs, hence, I’ve created a blueprint that shows you how you can make $3,000 per month.
That said, we have reached the end of “How to open a Selar account.”
If you got value, let me hear your thoughts using the comment below.


![Is Selar Legit? [Everything You Need To Know]](https://smartbizfreedom.com/wp-content/uploads/2022/11/selar-legit.jpg)
![How To Make Money With OwoDaily [Earn N1,000 Everyday]](https://smartbizfreedom.com/wp-content/uploads/2022/06/Owodaily-latest-withdrawal-768x377.jpg)
![How to Make Money Online in Nigeria Fast [Guide For 2025]](https://smartbizfreedom.com/wp-content/uploads/2020/05/How-To-Make-Money-Online-in-Nigeria.jpg)

Hello,
We set up our salar account last year and we want to start selling on it. However, we want to change our account details. How do we go about it? Thank you